
How Affinity Photo 1.10 Just Revolutionized My Retouching Workflow
Affinity Photo blows…
…the competition out of the water. Speed, UI and overall UX are the main reasons why I started using it 5 years ago for all commercial and art projects.
But with the recent (free!) update, they improved the most important feature for retouching portraits:
Frequency Separation
There is no professional, natural retouching of portraits without frequency separation in my humble opinion. For those who haven’t heard about it yet, it allows to separate an image in a high frequency layer containing all the image details (e.g. skin texture) and a low frequency layer with all the image’s tones. This allows for retouching skin tones and deficiencies without creating waxy, unnatural looking portraits. Once you start using it, you won’t go back to any other technique.
While previous versions of Affinity Photo were capable of performing frequency separation, the new version now offers three different methods:
Gaussian
Bilateral
Median
The Bilateral mode is just magic - it separates the details and tones in a far better way. The control over the separation process has vastly improved. Also, I find it to work considerably better when the the face has low resolution.
All in all, it helped me cutting time spent on retouching in half while improving the quality - this is truly a game changer.

Bilateral frequency separation in Affinity Photo v.1.10
To conclude…
I am super happy that now I can offer my clients even better results while spending less time doing so!

Things Can Go Wrong

Getting rid of bad work…
Yes, it happens. From time to time, I create really crappy pictures.
Analyzing failures over the years, I found out that one of the following issues are to blame:
Trial and Error
When trying new things, they do not always work out as intended. Those “mistakes” are my absolute favorites - because I learn a lot from them. I always push my personal boundaries, even if it means to fail sometimes.
Premature Actuation
Now this is probably the most frustrating type of Error. I am behind the camera and I already know that things won’t add up. The lighting is not perfect, the subject is not in the right pose or I am not sure whether everything is in perfect focus.
Nonetheless, I push the button - and create a crappy image.
Lessons Learned
As a photographer, you develop a gut feeling over time - and you should definitely trust it. Don’t take the image if you already know something is wrong.
And never ever experiment with a client in front of the camera (I never ever did that). Experiment with a pay model or a friend, but not if you have to deliver.

Instagram - How I Finally Gave Up
No, I did not delete my Instagram and I don’t intend doing so. Quite the contrary is true - you will see more videos, photographs and stories than ever before - so follow along!
But I gave up on fighting the Instagram algorithm. Up to now, I posted series of images and then a title card post as a separator. While I really love how the feed looks - it is really nice and structured - it really impacted my reach in a very negative way.
Because of course, people did not “like” the title card very often. And then Instagram was like “Oh yeah, every third photo of Thomas is really bad, so better not show his stuff too often”.
Now, after two years of negatively impacting my online presence, I gave up. No more title cards, good bye structured feed.

My old Insta-feed

My new Insta-feed - what do you say?

Effect Lighting With the Rogue Flashbender Softbox
Introduction
The Rogue Flashbender v3 is an incredible (maybe even indispensable) accessory for event and wedding photographers shooting with a single on-camera flash. In my opinion it is just the ultimate bounce “card” one can get.
But wait, there is more!
The Flashbender can be purchased with an optional cover that turns it into a softbox - so I wondered whether it can be used to create a unique lighting effect for outdoor fashion portraiture - spoiler: It can!

Rogue Flashbender with the softbox attachment
Effect Lighting with the Flashbender Softbox

This is the dramatic look - note that the model had no makeup and only a tiny amount of retouching was required!
Setup
Choose a focal length between 50 to 90mm - the example images where shot with a Voigtlander 58mm lens.
I found that the easiest way to attach the softbox to the Flashbender is to first attach the reflector to the flash and then put the whole thing on a flat surface, so the softbox attachment can be fixed conveniently.

The Rogue Flashbender mounted on the camera flash - quite an impressive combination.
Camera Settings
I recommend setting the camera to fully manual and aim for about three stops under-exposure. The less under-exposure without flash, the less apparent the effect of the flash will be.
Also, set the flash to a balanced TTL-mode if available.

On a Nikon camera, go for the TTL BL setting for a well-balanced flash output.
So what happens is that we get kind of a beauty dish look but with somewhat dramatic shadows because of the lighting position. The further the camera is moved down, the lesser the nose shadow will be. The rules teach you to avoid harsh nose and chin shadows at all cost - but I don’t care about the rules - I prefer an interesting look instead.

Lighting diagram - side view
If I would have to describe the results, I’d say it is somewhat of a compact camera flash look but with a strong portion of beauty dish mixed in. Thanks to the size and direction of the light source, skin defects are greatly diminished.

Depending on the distance between the subject and the photographer, an off-center subject might influence the shadow direction slightly.
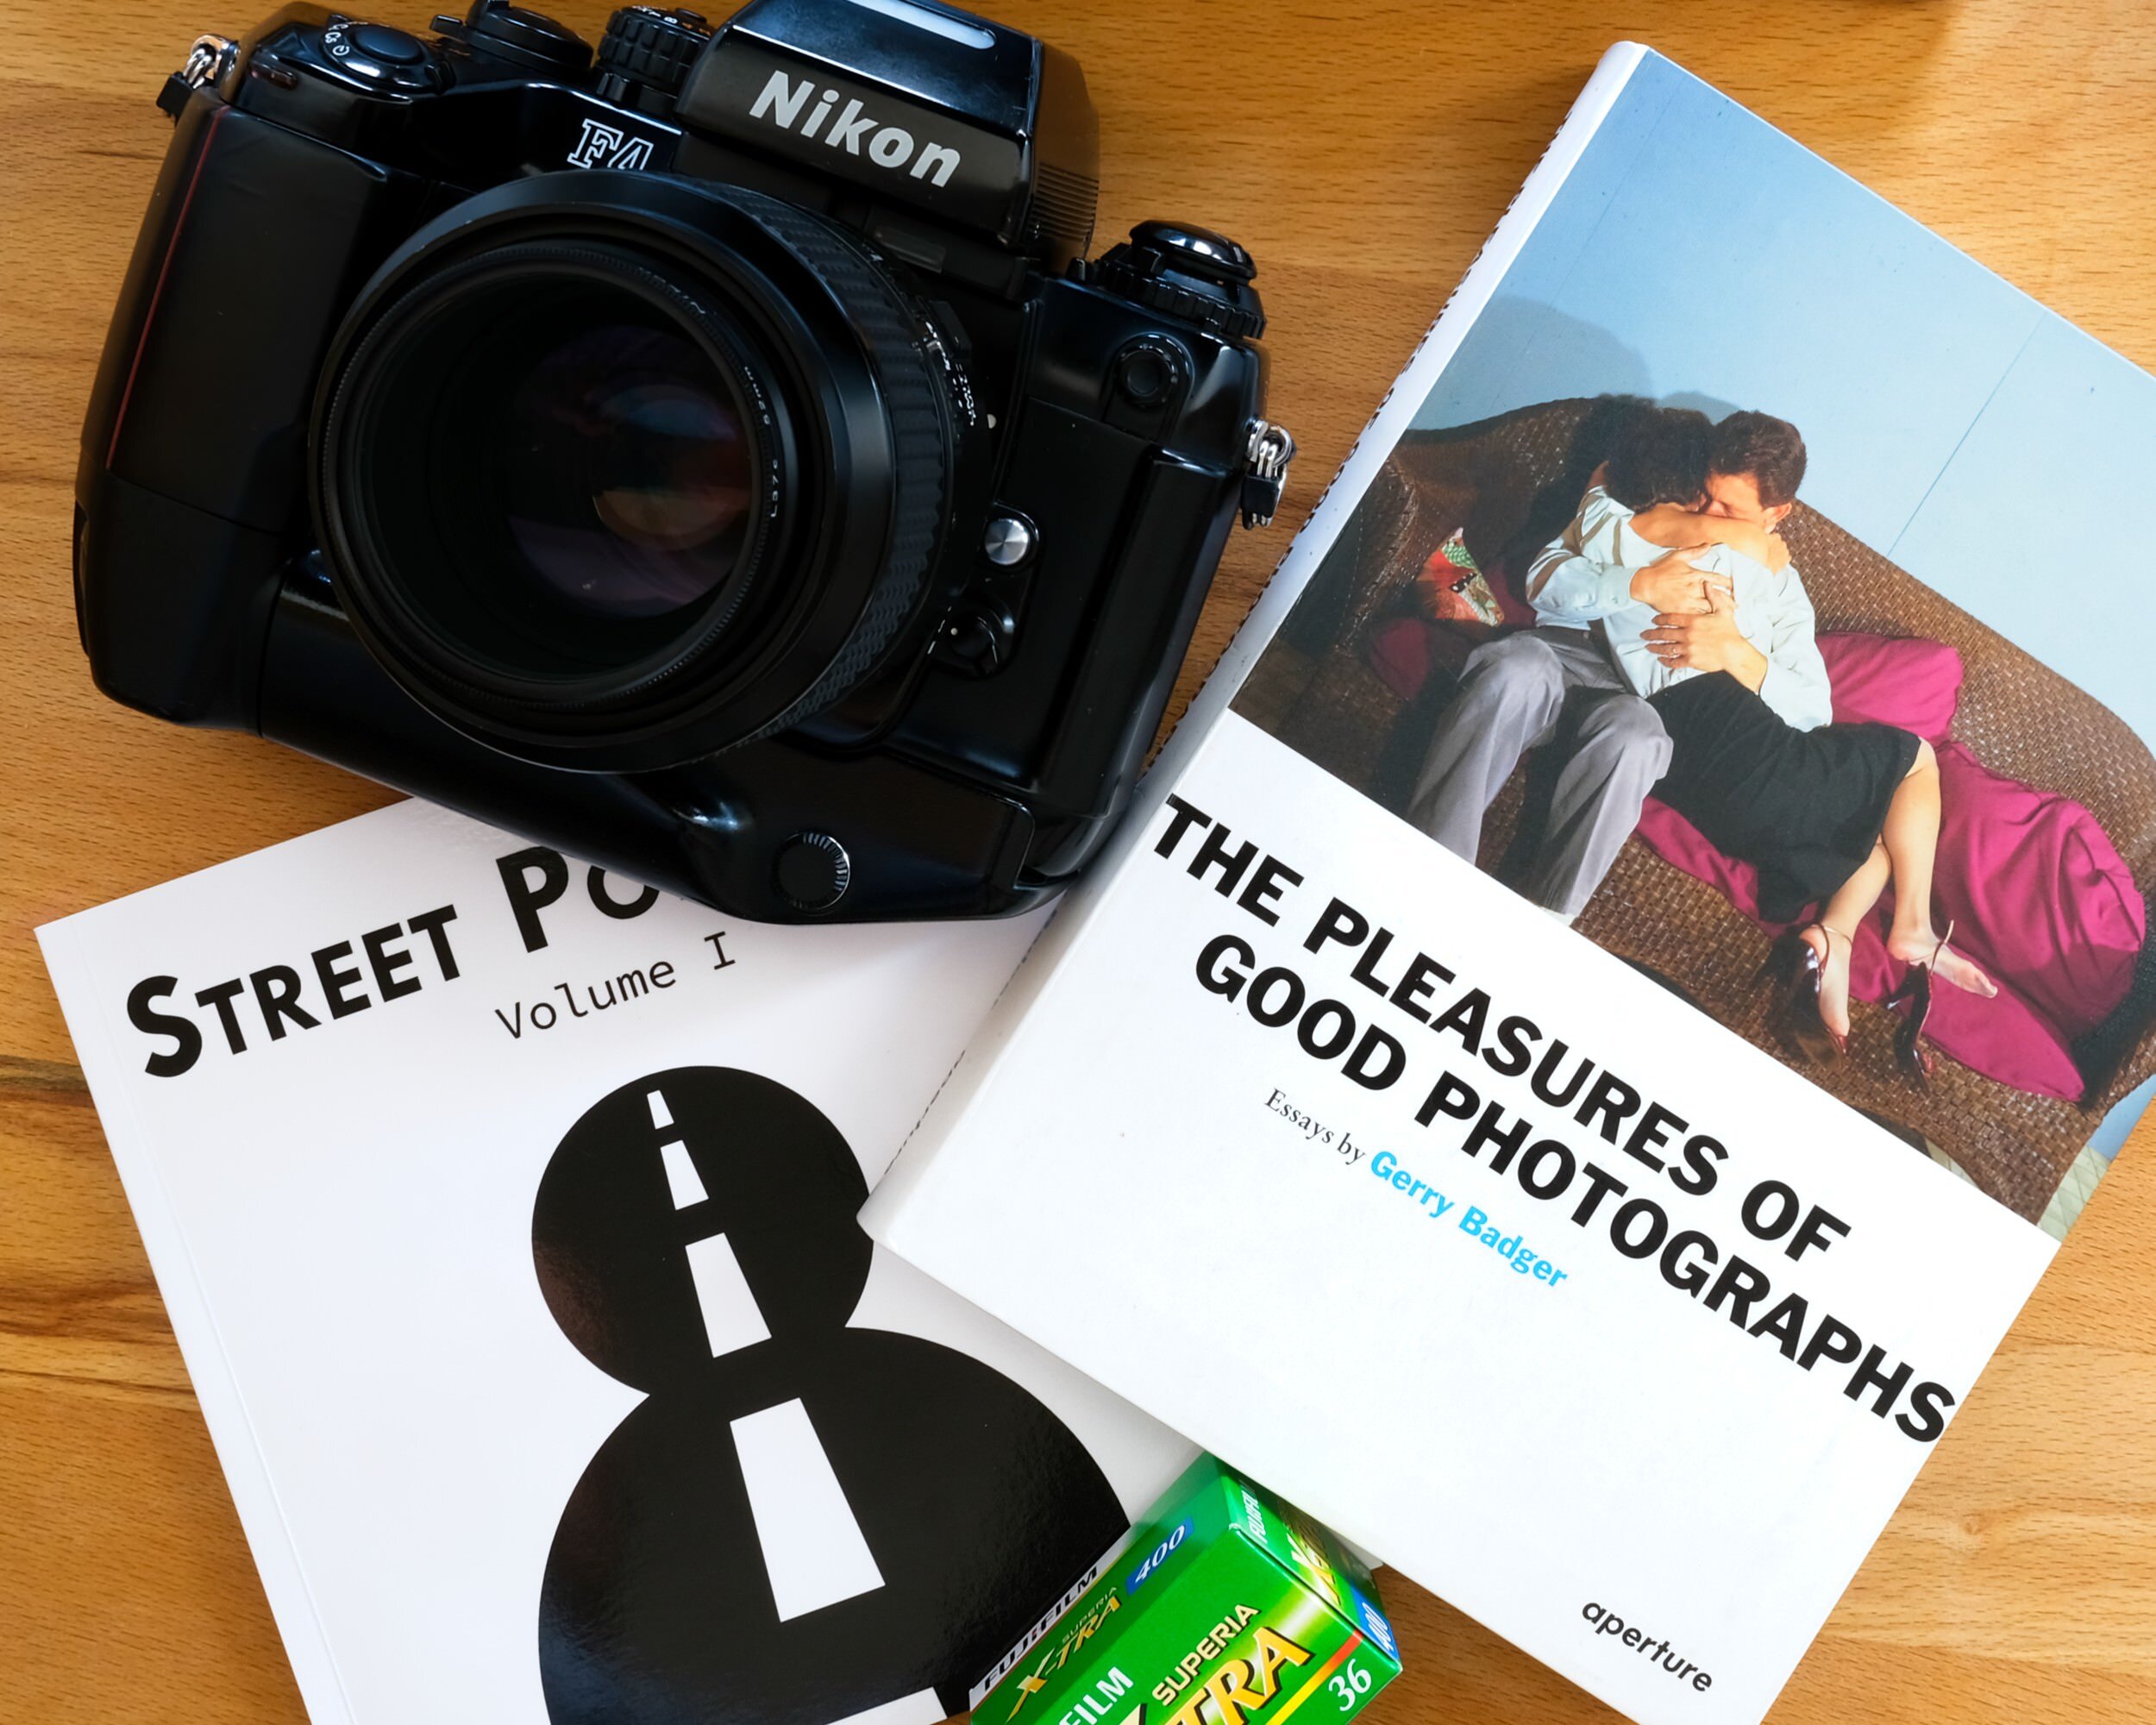
Photo Books - Creative Techniques
Introduction
The photo book is by many creatives considered the best way to publish printed photographs. It captures the essence of the photographers intent and offers many design possibilities.
In this article, I’d like to provide five creative techniques and inspiration for photo book projects.
5 Creative Techniques
1. Collection Scanning - Identifying a Theme
In case you struggle to find a theme, I recommend repeatedly going through your whole collection of images while listening to your favorite records.
Take notes and try do identify reoccurring subjects, perspectives, locations or emotions.
If your images are mostly digital, you can start copying images that “belong together” into a folder. Don’t constrict yourself by a too rational approach. Even if two images seem to not be connected, but you feel like they belong together, go with it. This might indicate a creative impulse worth exploring.
Importing your body of work in a single image reviewing program like Photo Mechanic can speed up the process considerably.

This is how an imported image collection looks like in Photo Mechanic. The program is unrivaled in speed and can work with hundreds of thousands of images easily.
2. Multimedia Brainstorming - Broaden the Scope
After identifying a general theme in the body of work, I recommend using what I like to call “Multimedia Brainstorming”. It is very similar to regular Brainstorming but adding more creative opportunities.
Start by writing one term that the defines the general starting point / theme you’ve already identified on a blank sheet of paper. Continue adding all the words and thoughts that come to your mind. Connect them to the starting term or related term with simple lines. Don’t leave emotions out of the picture. They are important ingredients and should definitely be written down.
Now consider adding objects and photographs (e.g. Instax prints) to the collage that you find fitting. I recommend reviewing the collage the next day and continue working on it.
You will find that the true theme or underlying themes become clearer in the process. Maybe you find yourself discarding some branches of the collage and feel the need to explore other branches by creating new photographs for it. This is exactly what’s meant to happen until you are completely aware of what your photo book should be about.

Start small and get big. An A4-sized sheet of paper might be a good starting point.
3. Get Real - Defining the Flow
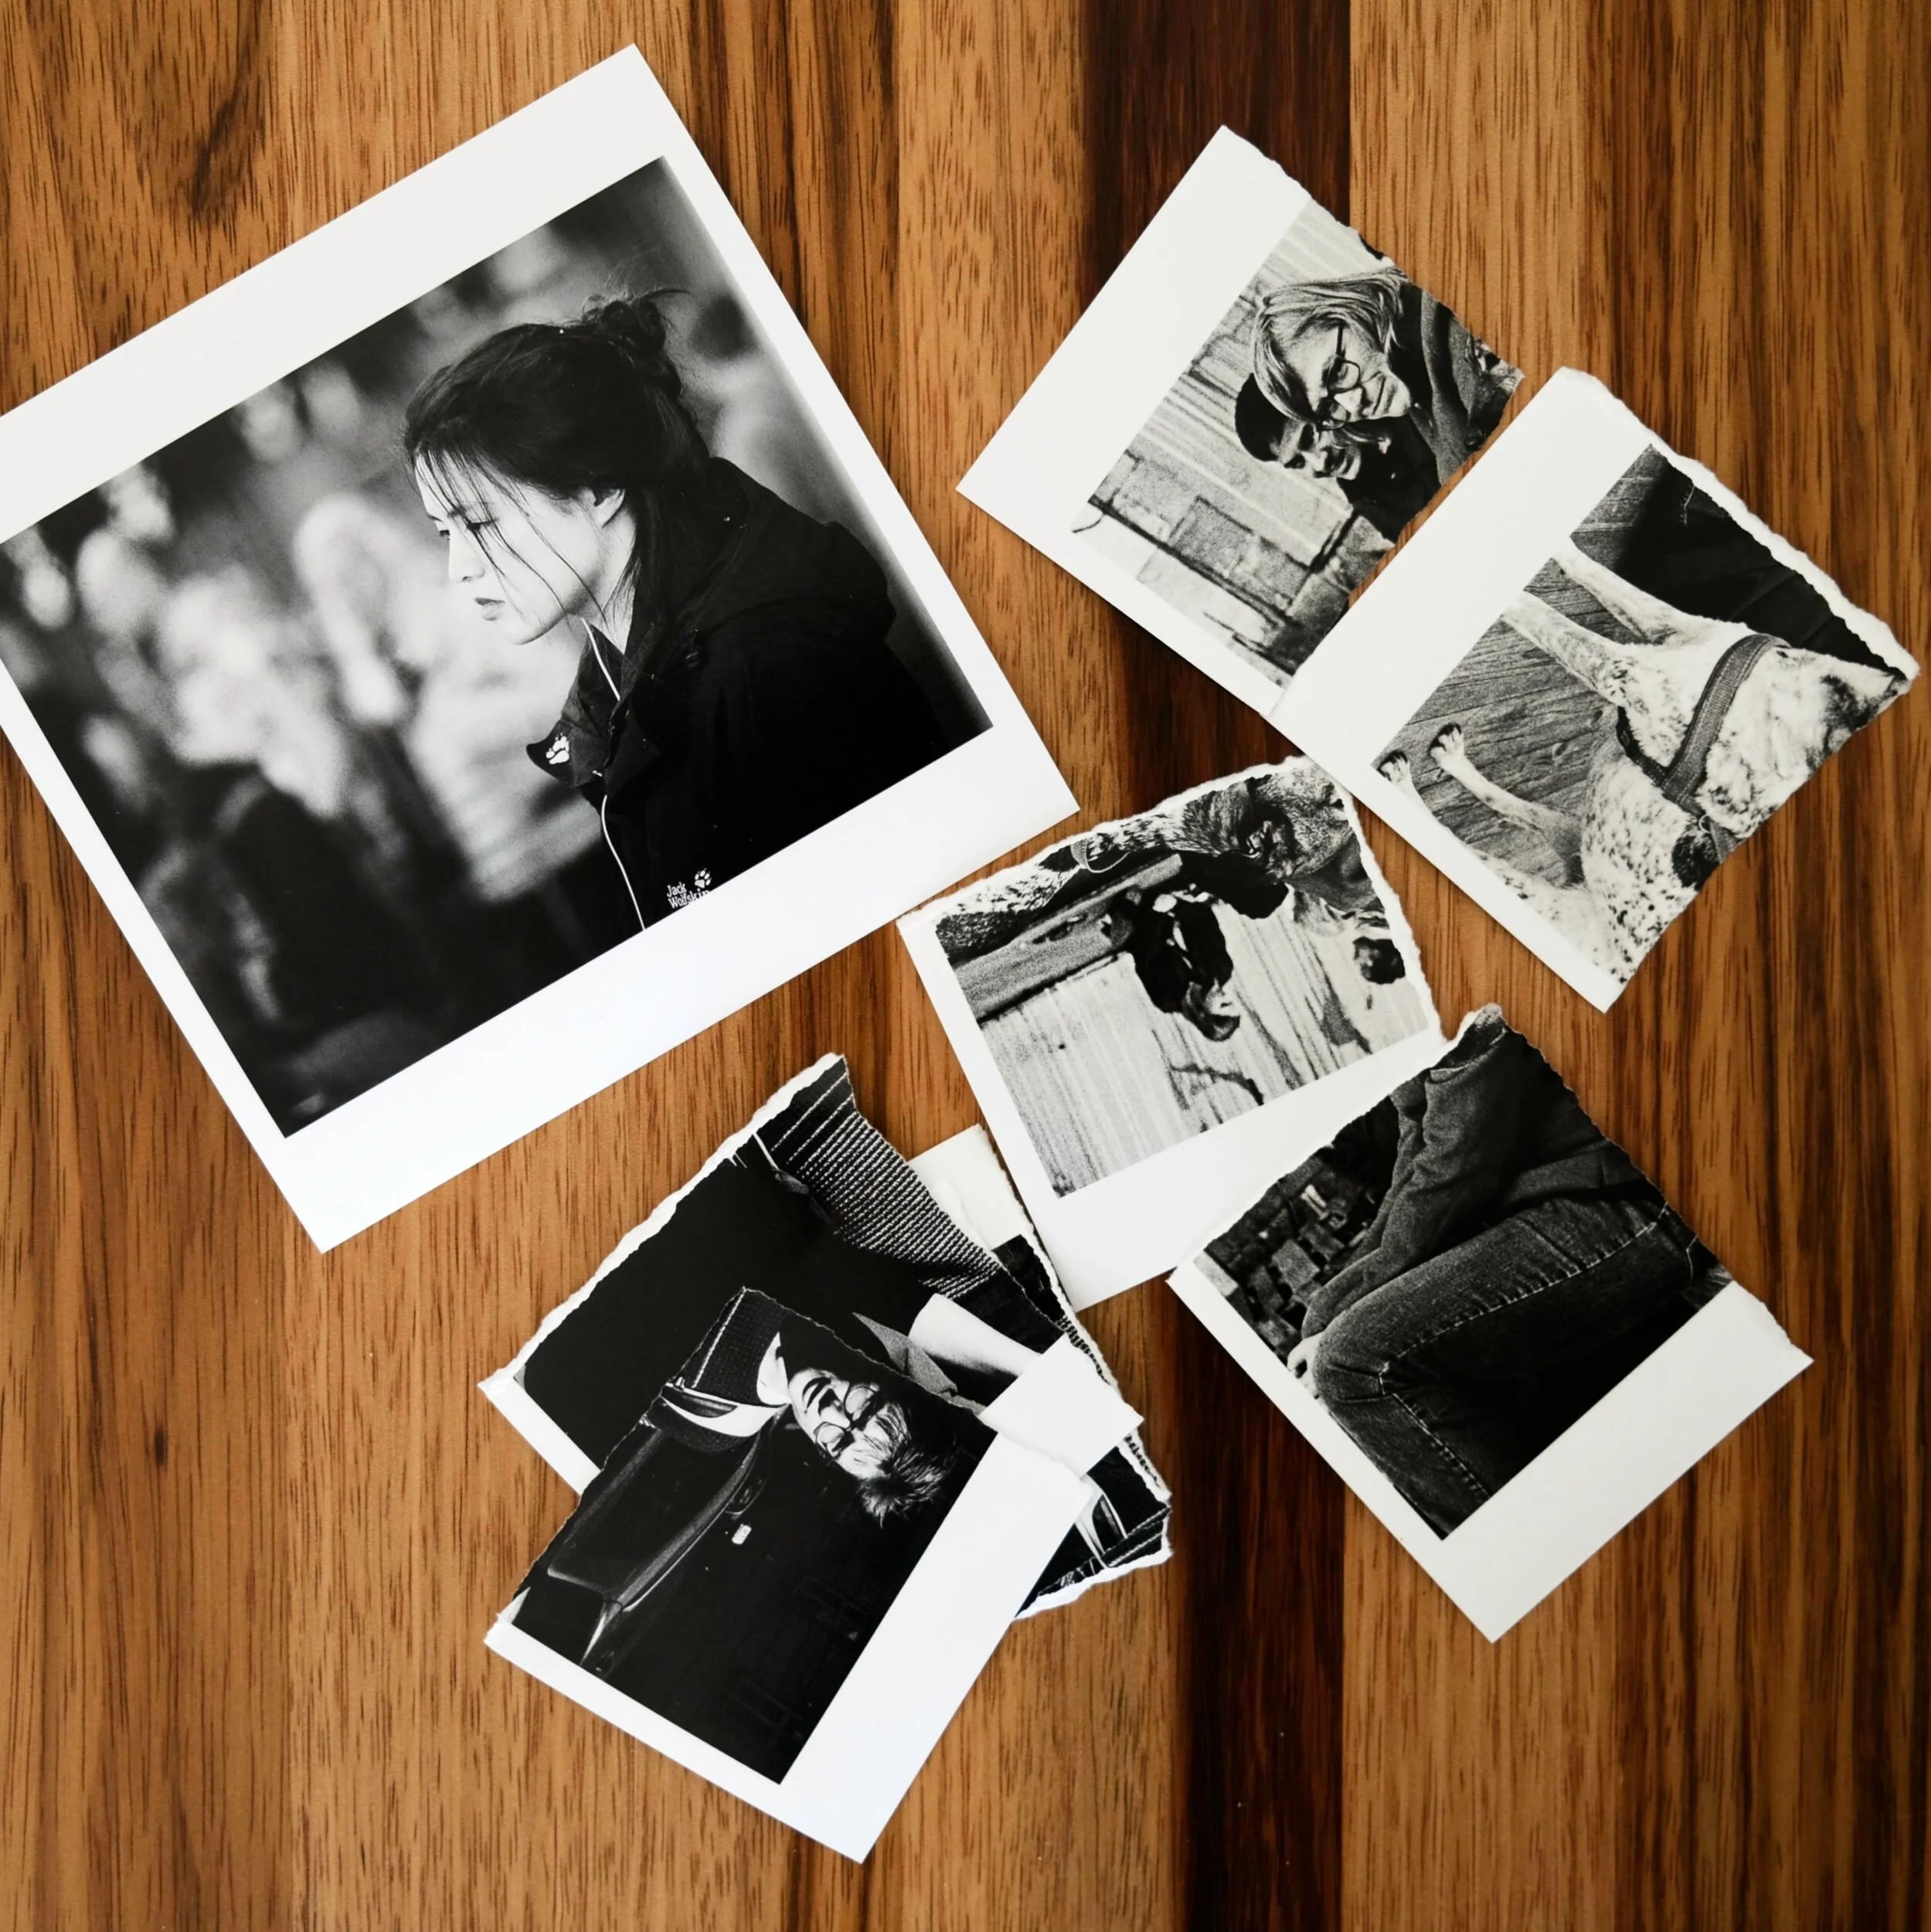
Continue by selecting a few images and print them. Really cheap prints are fine.

As I’ve decided for a square book format early on, it was only natural for the prints to be square as well.
By creating physical objects you get something to manipulate and carry with you. It makes the process of selecting images and arranging them for the photo book much more engaging. The fact that at least a little money and more consideration goes into every image improves the decision making process.
I also like the fact that real prints can be shown to friends, glued to pages of mockup versions of the book or stuck on the refrigerator. It makes the process much more tangible.
Don’t hesitate to get rid of images that don’t fit. It is a creative process and urges should be followed.
4. Off-Design - The Cover
While it is a tried and tested practice to put an image from the book on the cover, it is worth considering a completely different approach: “Off-Design”.
“Off-Design” is about creating cover art that is related to the content but does not show any of the photographs from within. Creating another Multimedia Mind Map might be a good starting point.

I’ve decided to go with a minimalist cover design incorporating three important aspects of street photography: People as subjects, the process as a personal journey and the focus on the quintessential.
5. Acid Test - Peer Review
After creating a first version of the book in a design software, it is a good idea to order a proof from services like Blurb.
With the proof in hand, go to fellow photographers with similar styles and different styles. Ask for their opinion over a cup of coffee. It is important to inquire how they feel about the book and which message it conveys to them.
It is not about getting remarks like “It’s nice” or “The photographs are sharp”. Be investigative and take notes.
Take your time to analyze the feedback and check whether their interpretations overlap with your creative intentions. Consider asking additional people for their thoughts, if you feel like the results so far were inconclusive.
Final Words
Creating photo books is a creative process, so be creative. If my techniques don’t speak to you, come up with your own. Have fun in the process and be aware that you will encounter a “creative rut” at some point. Being aware of possible frustrations helps to overcome them.

Scanner vs. Camera
Introduction
When it comes to digitizing a whole roll of film, camera scanning has a clear speed advantage over using a traditional film scanner. Nevertheless, after getting a high-end Plustek OpticFilm 120 scanner, I pretty much stopped camera scanning. Shooting more film lately and longing for shorter digitization times, I reopened my new digital darkroom with the Olympus OM-D M1II.
In order to decide whether it is time to sell my Plustek 120 or not, I decided to do an image quality comparison!
The Contestants

Image quality wise, the Plustek 120 is one of the best scanners currently on the market. It is able to digitize 35mm and medium format film while resolving unbelievable levels of detail. For exhibitions I scanned medium format film with this scanner and some of the images where printed 3x4m with astounding quality.
The Olympus OM-D M1II is a high-end digital flagship camera offering features which make it perfect for camera scanning. With its High Res mode, it shoots multiple images capturing an 80mpx RAW-file with full colour information.
Paired with the superb Olympus M.Zuiko Digital ED 60mm f/2.8 Macro, you get one of the best camera scanning setups money can buy.
The Test Negative
In order to compare the two scanners, I used a test negative that I shot for a different purpose on 35mm Ilford Delta 400. The negative was quite dirty and scratched up, which offers some pretty interesting insights as you’ll see below.
Comparing “Best Possible” Image Quality
Not taking scanning time into account, this test compares the optimum quality one can get out of the two contestants.
Plustek 120 Settings
Set to the maximum resolution of 10.600 dpi (resulting in a 143mpx file)
Multiple Exposure turned for maximum dynamic range
Olympus OM-D M1II Settings
Adjusted to capture a HighRes shot (resulting in a 60mpx file after cropping)
Exposure adjusted to minimize noise levels
Digital Processing
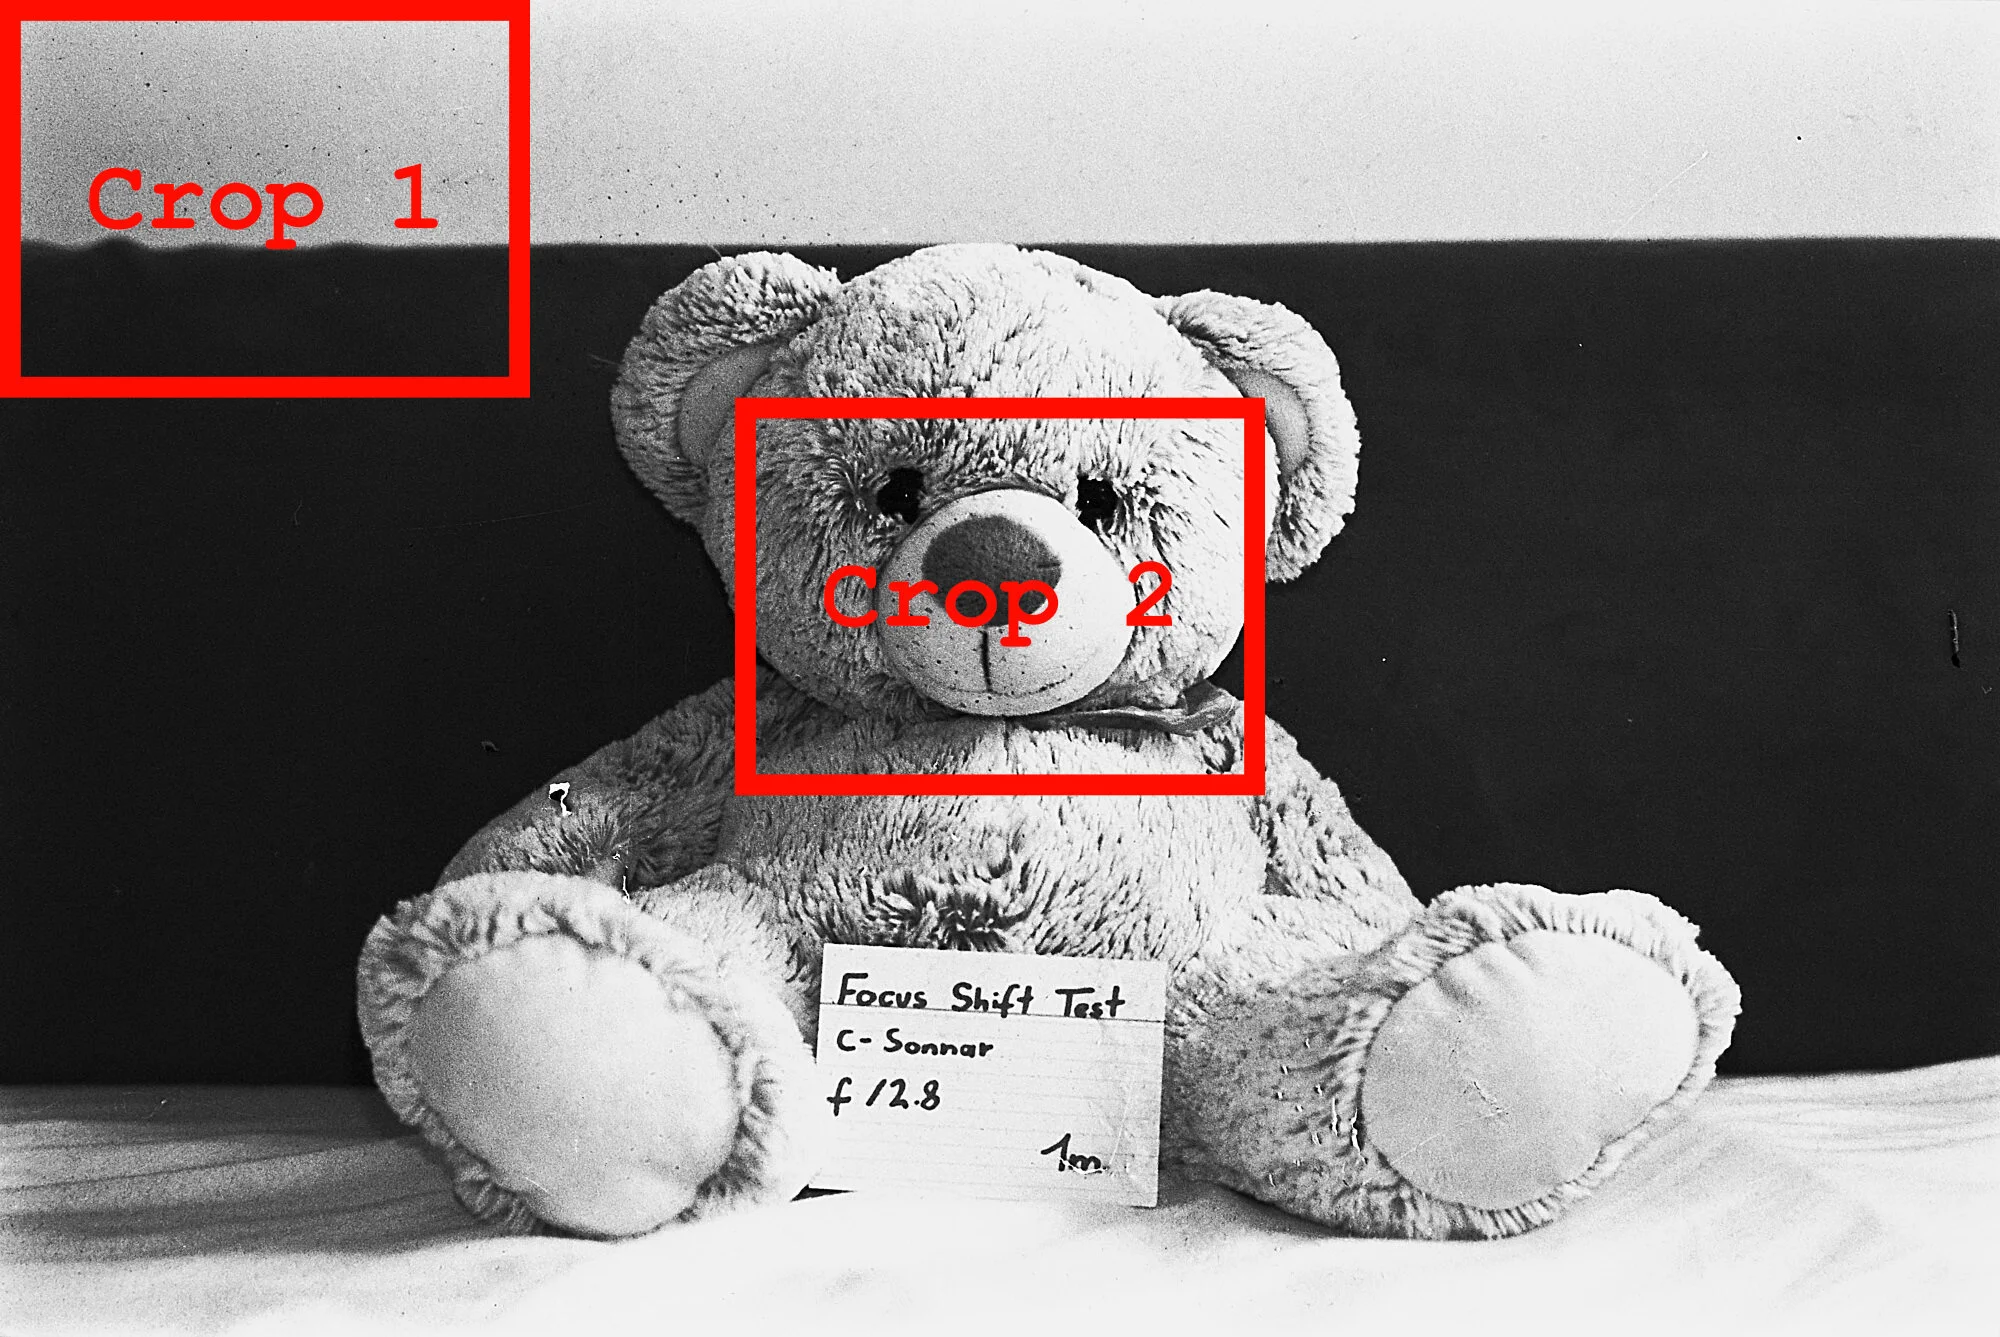
It was necessary to adjust tonality and to sharpen both images on the grain level to enable a meaningful comparison.
The reference image shows the approximate locations of the crops.
As the resolution differs, the Olympus images where upscaled in Affinity photo to match the Plustek files.
Images
Camera

Scanner

Camera

Scanner
Evaluating the Results
Regarding resolution and sharpness, the Plustek 120 has a slight edge over the Olympus OM-D. The grain is resolved a little bit better. It is difficult to decide whether this is a relevant difference or not, as I feel like that the OM-D is already resolving 99% of all the information available.
Regarding dynamic range, I can’t spot a difference, even when playing with the levels slider.
It is interesting though that the Plustek 120 digitizes more scratches and fine dust than the Olympus OM-D. I think this is because the OM-D “scans” only the emulsion side of the film, while the Plustek 120 seems to capture information from the non-emulsion side as well.
Comparing Relevant Image Quality
My assumption is that 12mpx is more than enough for 99% of all photographic applications. It is the resolution at wich I usually deliver my images to clients. So I decided to compare three different scans downscaled to 12mpx:
Plustek 120 scan @10600 dpi
Olympus OM-D High Res scan (~60mpx after cropping)
Olympus OM-D Standard Res scan (~20mpx)
Images
Plustek 120 @10600dpi
Olympus Standard Resolution
Olympus High Resolution
Evaluating the Results
At 12mpx, there is no difference in resolution or sharpness visible.
The slight difference in contrast and tonality is because I did not adjust the examples to exactly match each other.
And the Winner Is?
The Plustek 120 is a dedicated high-end film scanner, and in terms of pure image quality, it is therefore no surprise that it delivers slightly better results than any camera scanning setup.
We have to take into consideration though, that only high-end scanners starting around 1.800 € can deliver the same versatility regarding input format as a camera scanning setup while at the same time offering (slightly) better image quality.
The Olympus OM-D delivers very competitive results, and I’m convinced that 99% of people won’t notice the difference even when pixel peeping. Camera scanning is considerably faster though especially when batch scanning a roll of film - it can be done in around 5 minutes (without post processing).
Nonetheless, I will keep my Plustek 120 for now and see how satisfied I am with camera scanning process in the long run.

Air Dusters
Introduction
Dust - the analogue photographers natural enemy. Anyone printing in the darkroom or scanning negatives knows this foe very well.
As analogue film is a very sensitive material, removing it with an antistatic cloth might scratch the surface and even the best anti-static brushes from Kinetronics and Delta 1 can only complement but not substitute pressurized air.
A standard rubber blower does usually suffice, but for anyone scanning / printing a lot (or professionally), the squeeze-and-blow routine is tiring and inefficient. That leaves the photographer with cans of compressed air aka air dusters.
Compressed Air Dusters - what to look out for
Air dusters are non-reusable products, so I recommend paying attention to the environmental friendliness (e.g. type of propellant, eco-certificates, minimum plastic components)
The nozzle has to be small in order to provide the high pressure needed to remove statically charged dust from the negative
Only buy the highest grade compressed air cans, as only then clean air and no harmful ingredients are guaranteed. Film is archival, but chemical agents might deteriorate it - only blow the best air available on it.
Recommended Product - Green Clean
Green Clean is an Austrian company producing industry-grade cleaning equipment. A lot of camera repair shops in Vienna and professional labs only use their products - and so do I. The advantages are:
No chemically active ingredients
high-quality accessories (e.g. different nozzles)
eco-friendliness
reasonably priced
I never had any residue on my film or photographic equipment. Their products are also suitable for cleaning digital camera sensors.

Green Clean Air Duster with reusable nozzle

Green Clean Air Duster rectangular nozzle - it provides a powerful stream of clean air
Other Products
You can get cans of compressed air in almost every supermarket / electronics store and I would not hesitate using them for cleaning my laptop’s fan or dusting off a UV-protection filter.
However, I would not use them on photographic films though, as some of them proved to be prone to leave a residue of unknown (probably harmful) residue, which I had to remove with Tetenal graphics arts film cleaner, risking to scratch the negative with the cloth required in the process. Don’t risk it!

Hama Air Duster for general purposes
User Tips
Do not leave the negative on the desk when blowing air on it but hold it up. Otherwise the air stream will raise dust from the desk / light table which will immediately deposit on the negative once the stream of air is gone.
Do not shake any air duster can before use (like you would shake a spray can). The propellant will contaminate the air stream - risking damage to the object you are trying to clean.
Always use the can in upright position, or you again risk the propellant entering the air stream and freezing/damaging the surface.

Propellant in the air stream freezing / damaging the surface

Praise From a Legend
There is always this one photographer or artist, who inspires you more than any other. His work resonates with you like no one else’s.
For me, this photographer is Jacques Schumacher. Born in 1933 in the Netherlands, he is often called the “Grandseigneur” of German photography. His photographs are not only visually pleasing and full of creativity, but also loaded with double or triple meanings. His iconic images are well known from advertisements and exhibitions alike. If you are not familiar with him, take a look at his website immediately, you won’t regret it.
For me, it were especially his “Blue Pictures” that inspired me to take up art nude photography.

So when I recently published my series “Backstage Blue” I gathered my courage and sent the legend a message. I did not really ask for critique, as I do not consider my work to be on par with his at all. To my complete and utter surprise, he actually answered and critiqued the series as “excellent” and emphasized that he likes the fact that my work was shot on analog film.
There are a few moments in life which affirm that one has made the right decisions. That the path one has chosen was and still is the right one. This was one such moment for me and I am forever thankful for that experience.
I am a photographer and always will be.
But it is not just Jacques Schumacher’s critique that keeps me going as a creative. Every remark - be it positive or negative - helps me to continue my journey as an Artist.
Thanks to all of you!
.Thomas
Does It Develop?
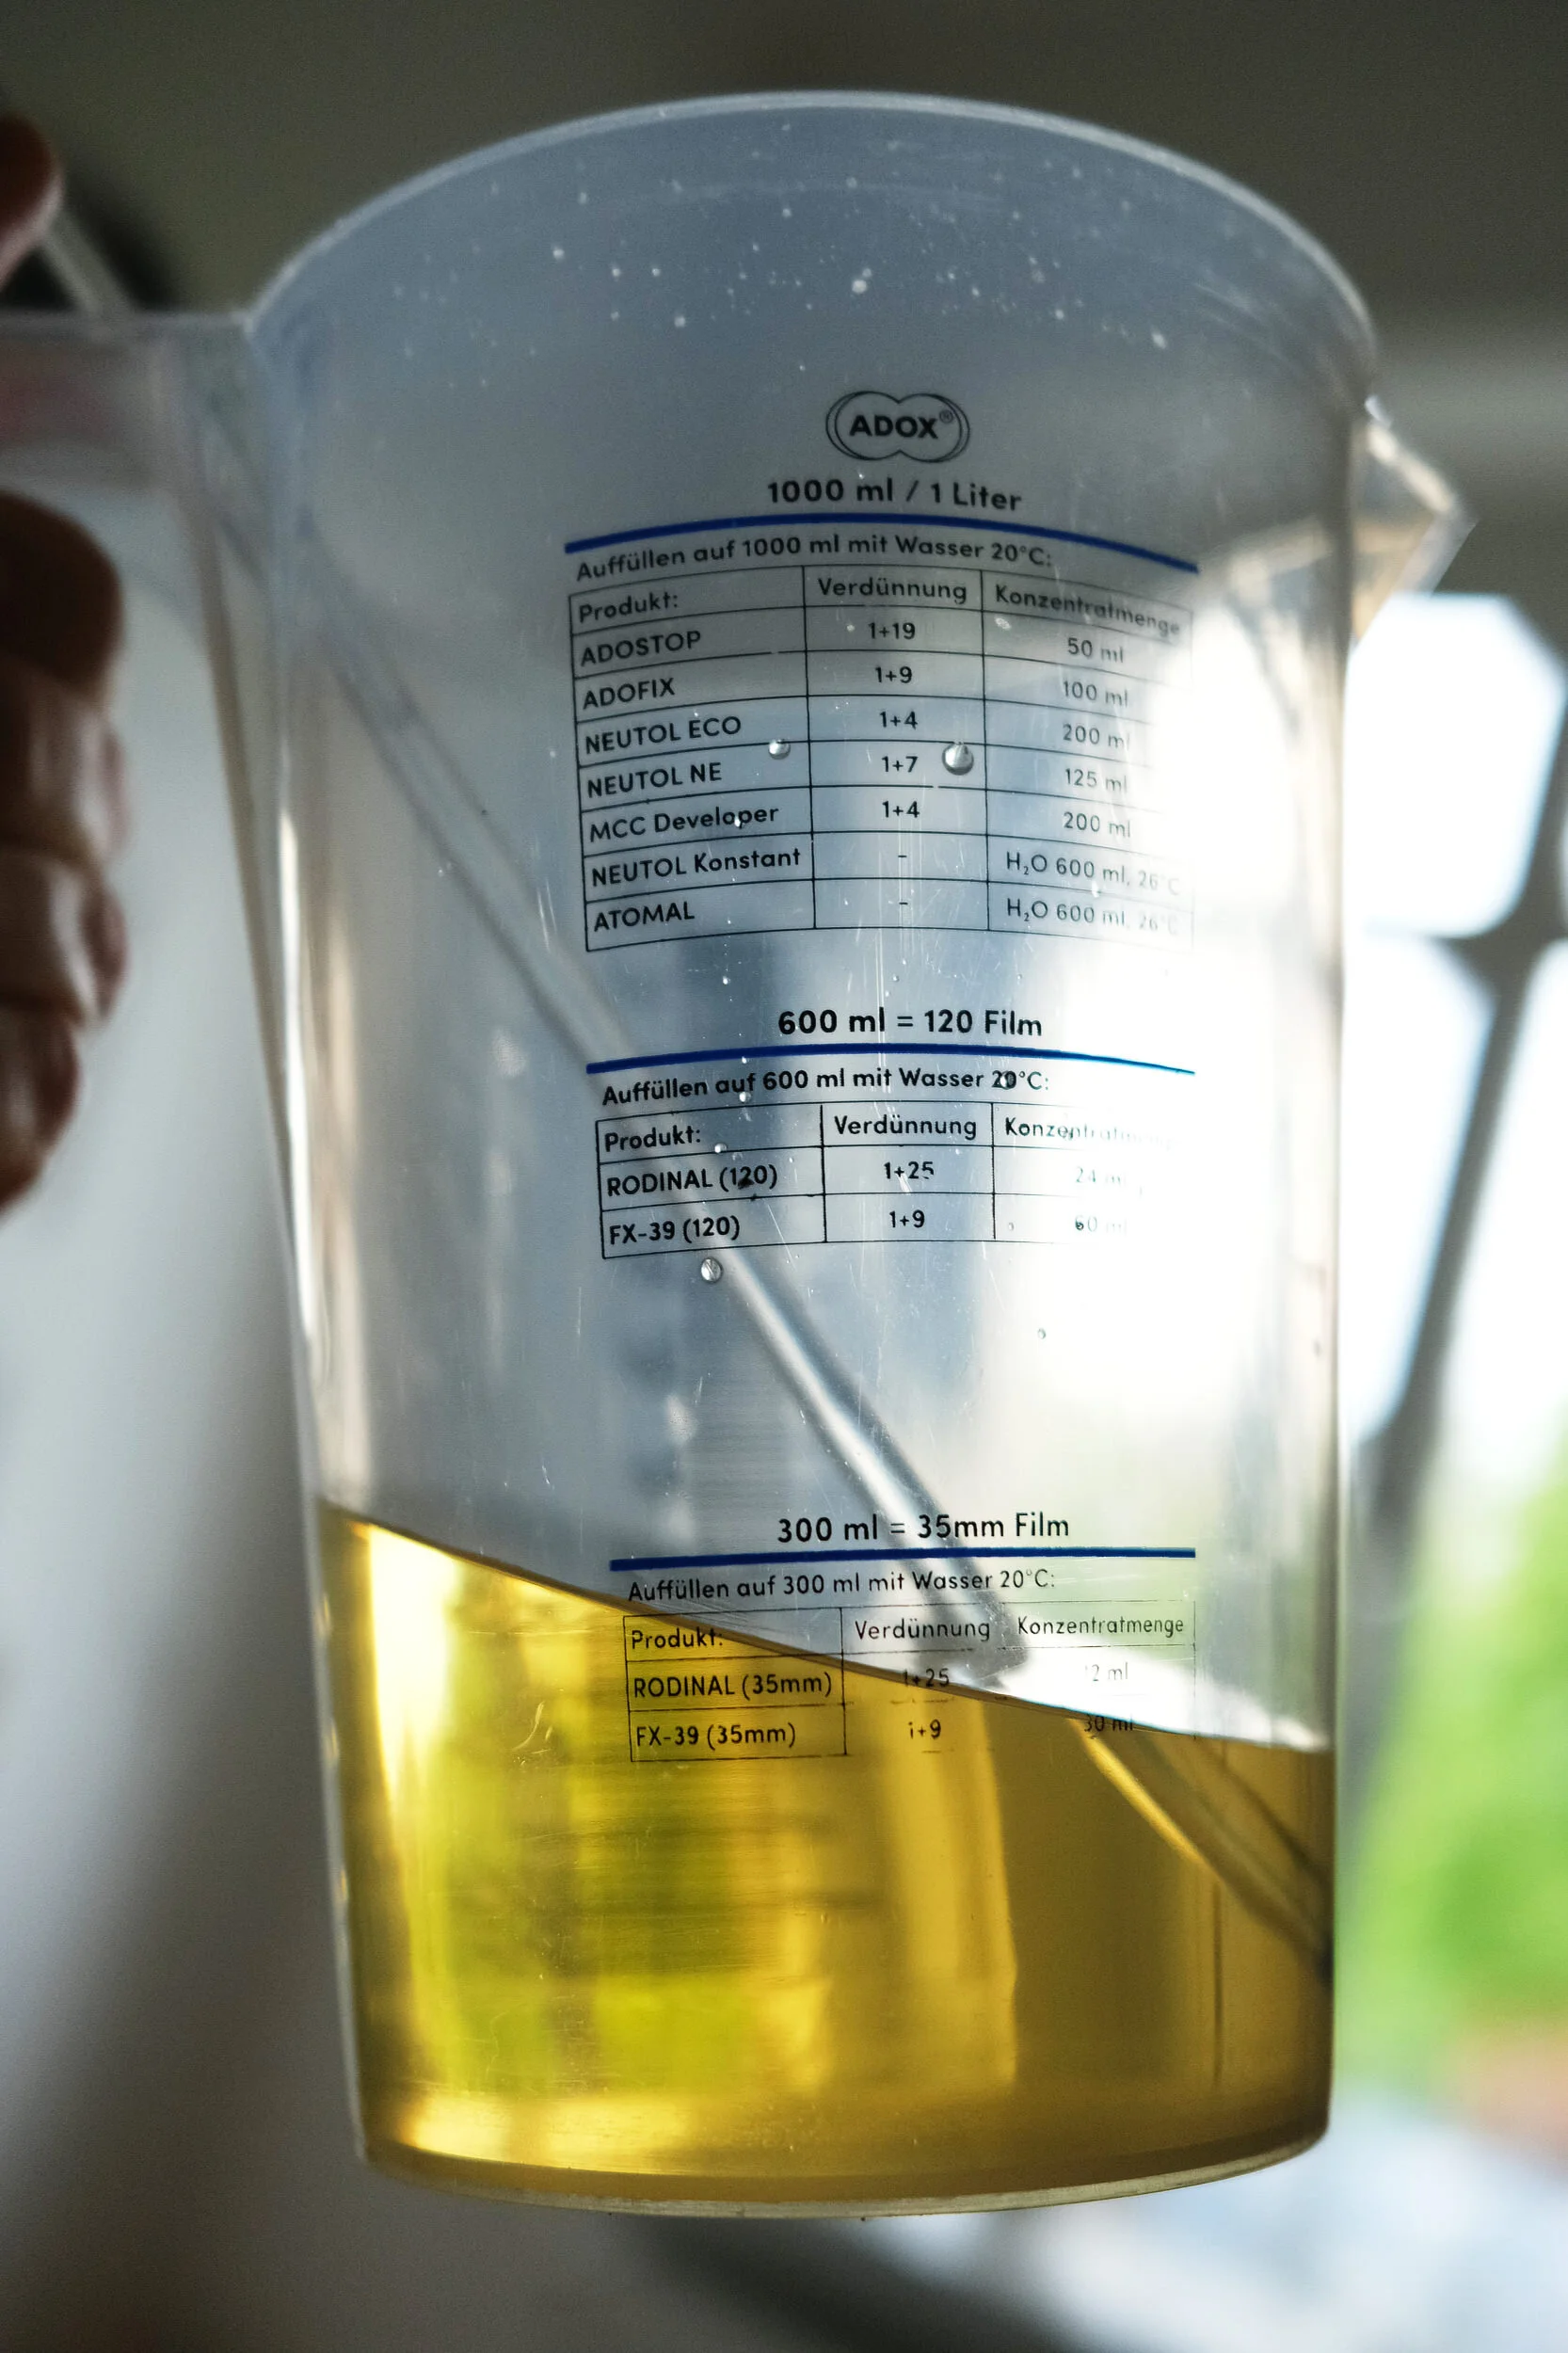
Kodak D-76 should be a clear liquid - only when it goes bad, it should turn yellow-brownish (because of the oxidation process).
However, I recently purchased a pack of D-76 (recent batch!) and the powder was already of a yellow color.
Usually I discard dubious looking chemicals in favor of a fresh pack without wasting a thought, but this time I had no D-76 left. So I decided to give it a shot.

Kodak D-76 Limited Edition?
DID IT DEVELOP?
Yes it did! I processed a test roll and everything came out perfectly, much to my surprise.
Maybe I got a special edition from Kodak to honor the Pantone color of the year, which is yellow.
Who knows?
Bare Minimum
I always bring backup equipment to a shoot - two bodies, two primes (somewhere between 28mm to 135mm) and a mid-range zoom (28-70mm or 24-120mm). Backup cards and batteries are a must as well.
While I love being prepared for all sorts of equipment failure and changing shooting conditions, I decided to do things differently on a recent portrait session.
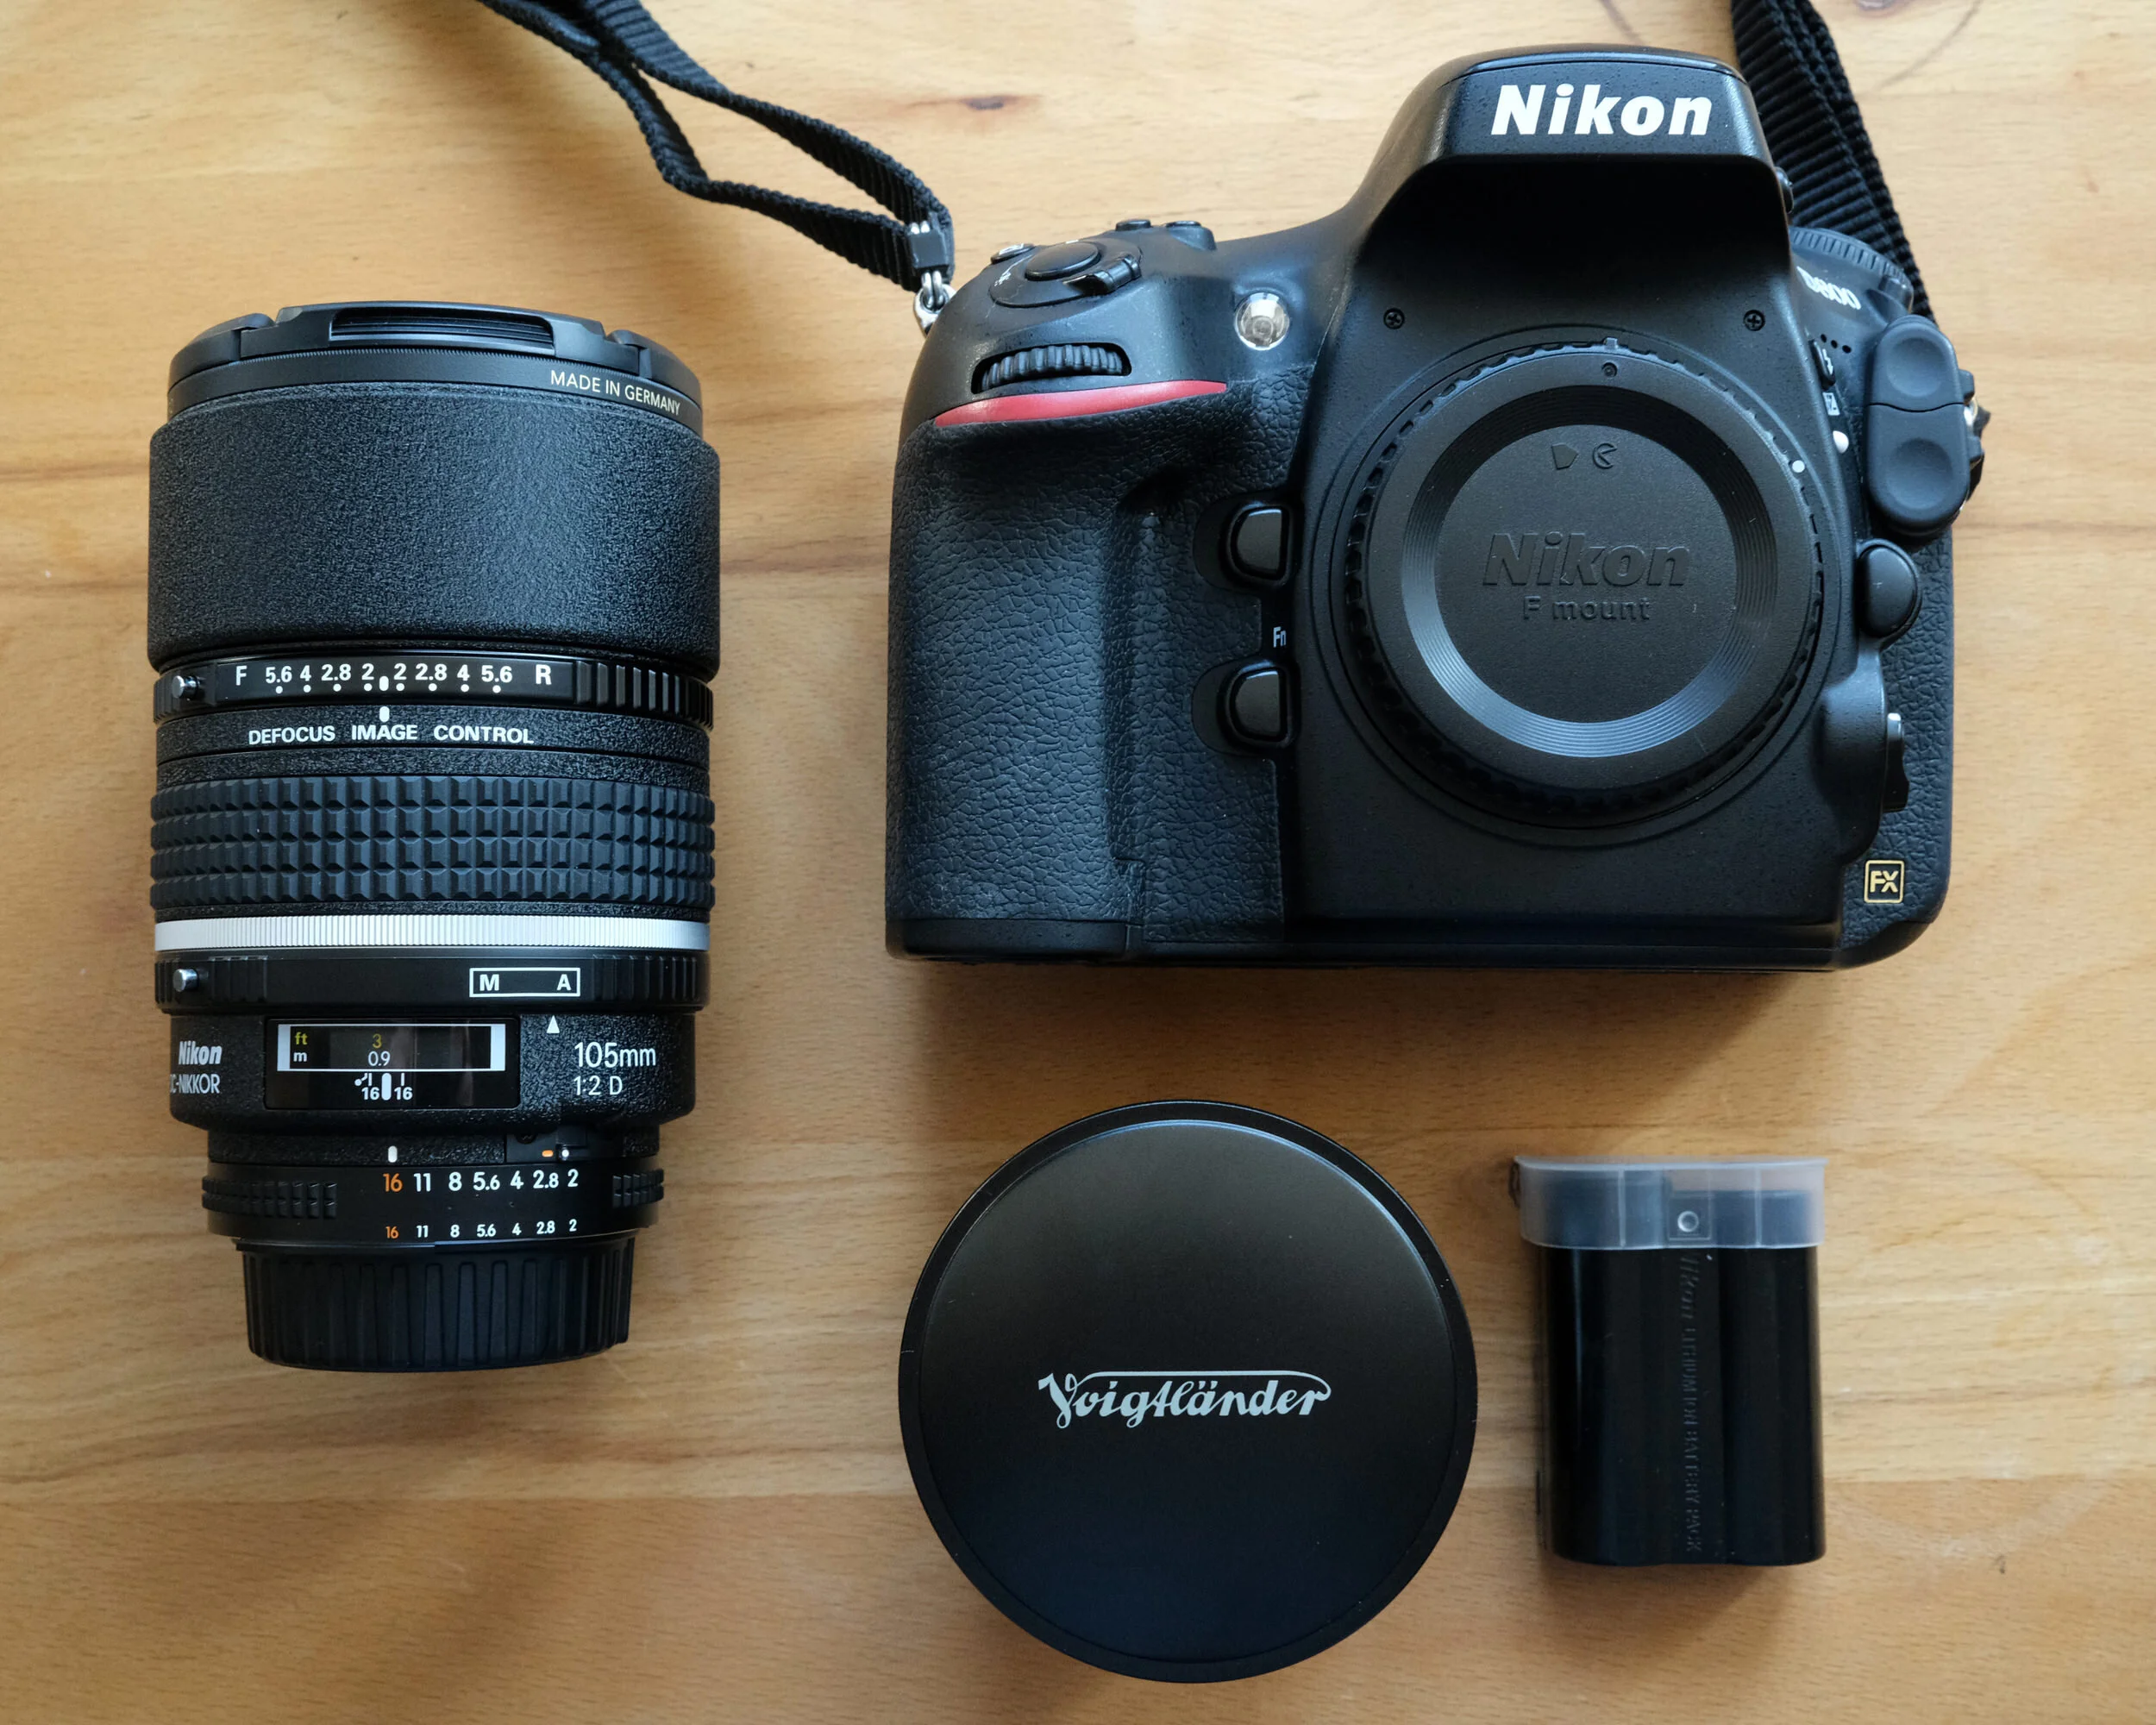
I only brought the bare minimum of photographic gear: My Nikon D800, the Nikkor 105mm f/2 DC for headshots and the Voigtlander 40mm f/2 for full-body shots and a spare battery.
How was it then? Carrying a lighter bag was convenient, but not having my full setup to choose from, led to a feeling of anxiety. In the end, everything worked out, my Nikon never let me down so far.
However, would I recommend going out without backup equipment? No - never risk not being able to deliver ever. It ruins your reputation.

I have to admit that the shooting did not take place far away from my studio, so in case any critical equipment failure would have occurred, I would have been able to get a replacement in under 20 minutes. Otherwise I would have brought at least a Fuji X100V as a backup.
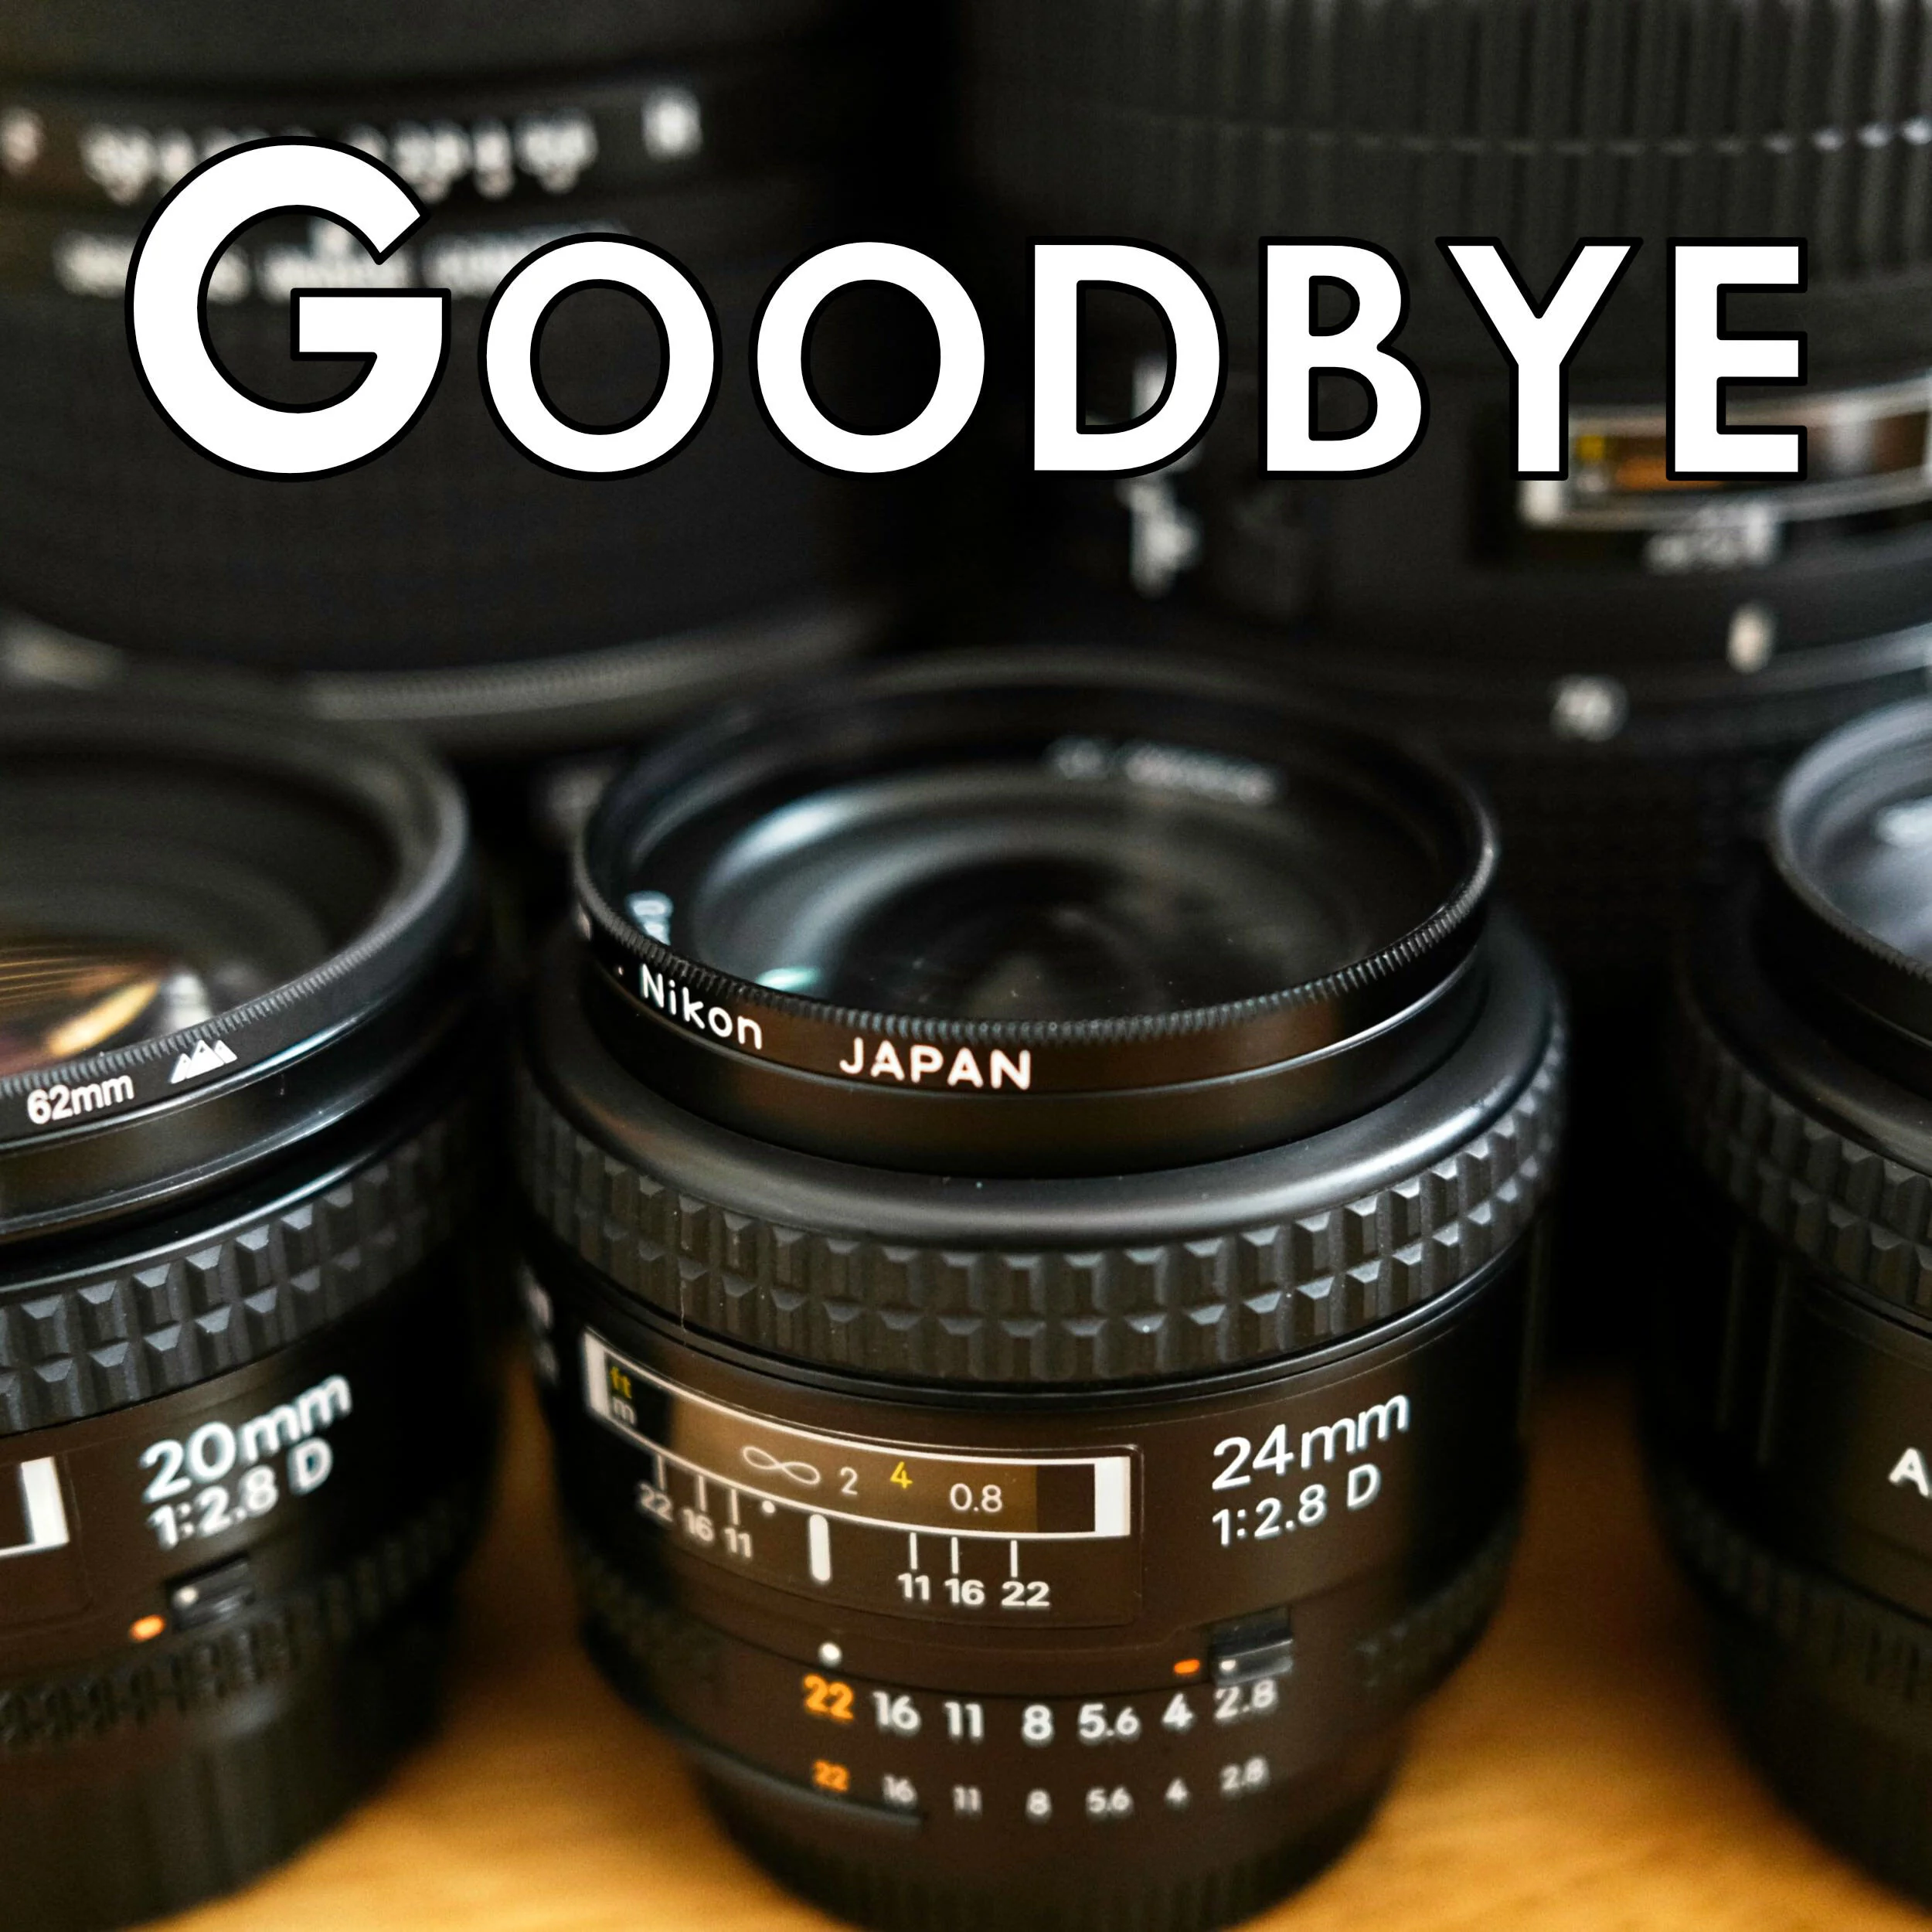
Goodbye, AF-D Lenses?
First things first: I don’t like Nikkor AF-D lenses - I love them.
However, I noticed that some of my favorite AF-D lenses were listed as discontinued products, indicating that Nikon is slowly phasing out AF-D lenses and is only selling remaining stock.
Here is why you might want to get an AF-D lens while they are still available new:
Compatibility
Nikon was always concerned with compatibility. With the Nikkor AF-D lenses, they’ve created the most compatible F-mount lenses on the market. They can be used with any Nikon film or digital SLR ever made - without real compromises.

The 24mm AF-D is one of the best 24mm lenses available for Nikon F.
Aperture Ring
All AF-D lenses come with an aperture ring. This allows them to be used with any Nikon film SLR (e.g. Nikon FM2N) and on DSLRs, one can choose whether to set the aperture via the lens ring or the control dials.
Screw-Coupled Autofocus
AF-D lenses do not have an auto-focus motor (*) in the lens - they utilize the AF-motor of the camera. In practice:
If there is no AF motor, the lens can be focused just like every other manual lens (e.g. on a Nikon F3) without flicking a switch or adjusting anything.
If there is an AF motor in the camera body (e.g. Nikon D850), the lenses will focus accurately and quickly.
There is no motor in the lens that can break.
Unfortunately, they cannot auto focus on Z-mount cameras.
(*)There are a few AF-S lenses with an aperture ring like the outstanding 28-70 f/2.8. They are also fully backwards compatible.
Optical Properties

The outstanding 50mm f/1.4 AF-D with lockable aperture ring.
Good lens design means for me that the lens offers “character”. I am not really a fan of these overly polished lenses offering perfect corner to corner sharpness and clinical rendering.
While there are such lenses available in the AF-D lineup, most of them have “character” - that many modern lenses lack - while still being very sharp with plenty of micro contrast (even on ultra-high resolution sensors). A little bit of magic I’d say.
Note: When used on a digital Nikon body, they can of course be automatically corrected in-camera of course.
Build Quality
Some of the most exciting AF-D lenses come with a metal housing (Nikkor 105mm f/2 DC, Nikkor 135mm f/2 DC and many more), while the others are made of high-quality plastics on the outside.
It is just unbelievable how well made both types are. Professional quality without a doubt.
Value for Money
On the used market, AF-D lenses are absolute bargains. You get a professional lens like the Nikkor AF 50mm f/1.4 D for around 150 Euro.
If you can find one of them new in stock at your local photo store, these amazing 50mm lenses go for around 300 Euro.
Final Words
Interestingly, the existence of AF-D lenses was one of the reasons which got me into the Nikon ecosystem. Having professional, high-quality, affordable and fully backwards compatible lens options was something that only Nikon, Leica and Pentax offered. I am sad to see them go and I can only recommend you to get at least one AF-D lens for your (D)SLR. Warning: You might end up with a collection of awesome lenses in the end.

Analog Product Photography Fail
Back to the Roots
Slide film was the de-facto standard for commercial photography before digital. So I said to myself: Why not add some high-end product shots on slide film to the commercial portfolio? My Nikon F4 was still loaded with Fuji Provia 100F from a previous project so I decided to give it a go (not that I was drowning in work during another lockdown in Vienna).
Setting It Up
I decided to start with the most difficult subject first: A chrome Wahl Hair Clipper (100-years edition). Armed with a blower and a polishing cloth, I made sure everything was nice and clean.
I metered meticulously and made sure that the exposure was spot on (its slide film after all) and the reflections were where I wanted them to be.
A quick tip: Always use a grey card and a handheld light meter for studio product shots. Its an easy and precise way to determine the amount of light hitting the subject from all sides separately.

A Gossen Sixtomat F2 and a grey card - my best friends for studio photography
Fail
But when I tried to take the shot with the Nissin Air 10s flash trigger mounted on the F4, I was shocked to find out that the flash did not fire. No matter whether I cleaned or how much I wiggled the trigger back and forth, nothing happened. Even the flash icon in the finder lighted up indicating that the F4 was aware of a mounted flash, however, the wireless trigger did not trigger anything except me.
Happy End
Without further ado, my D800 switched places with the F4 and I at least got the shot which took me so long to set up.
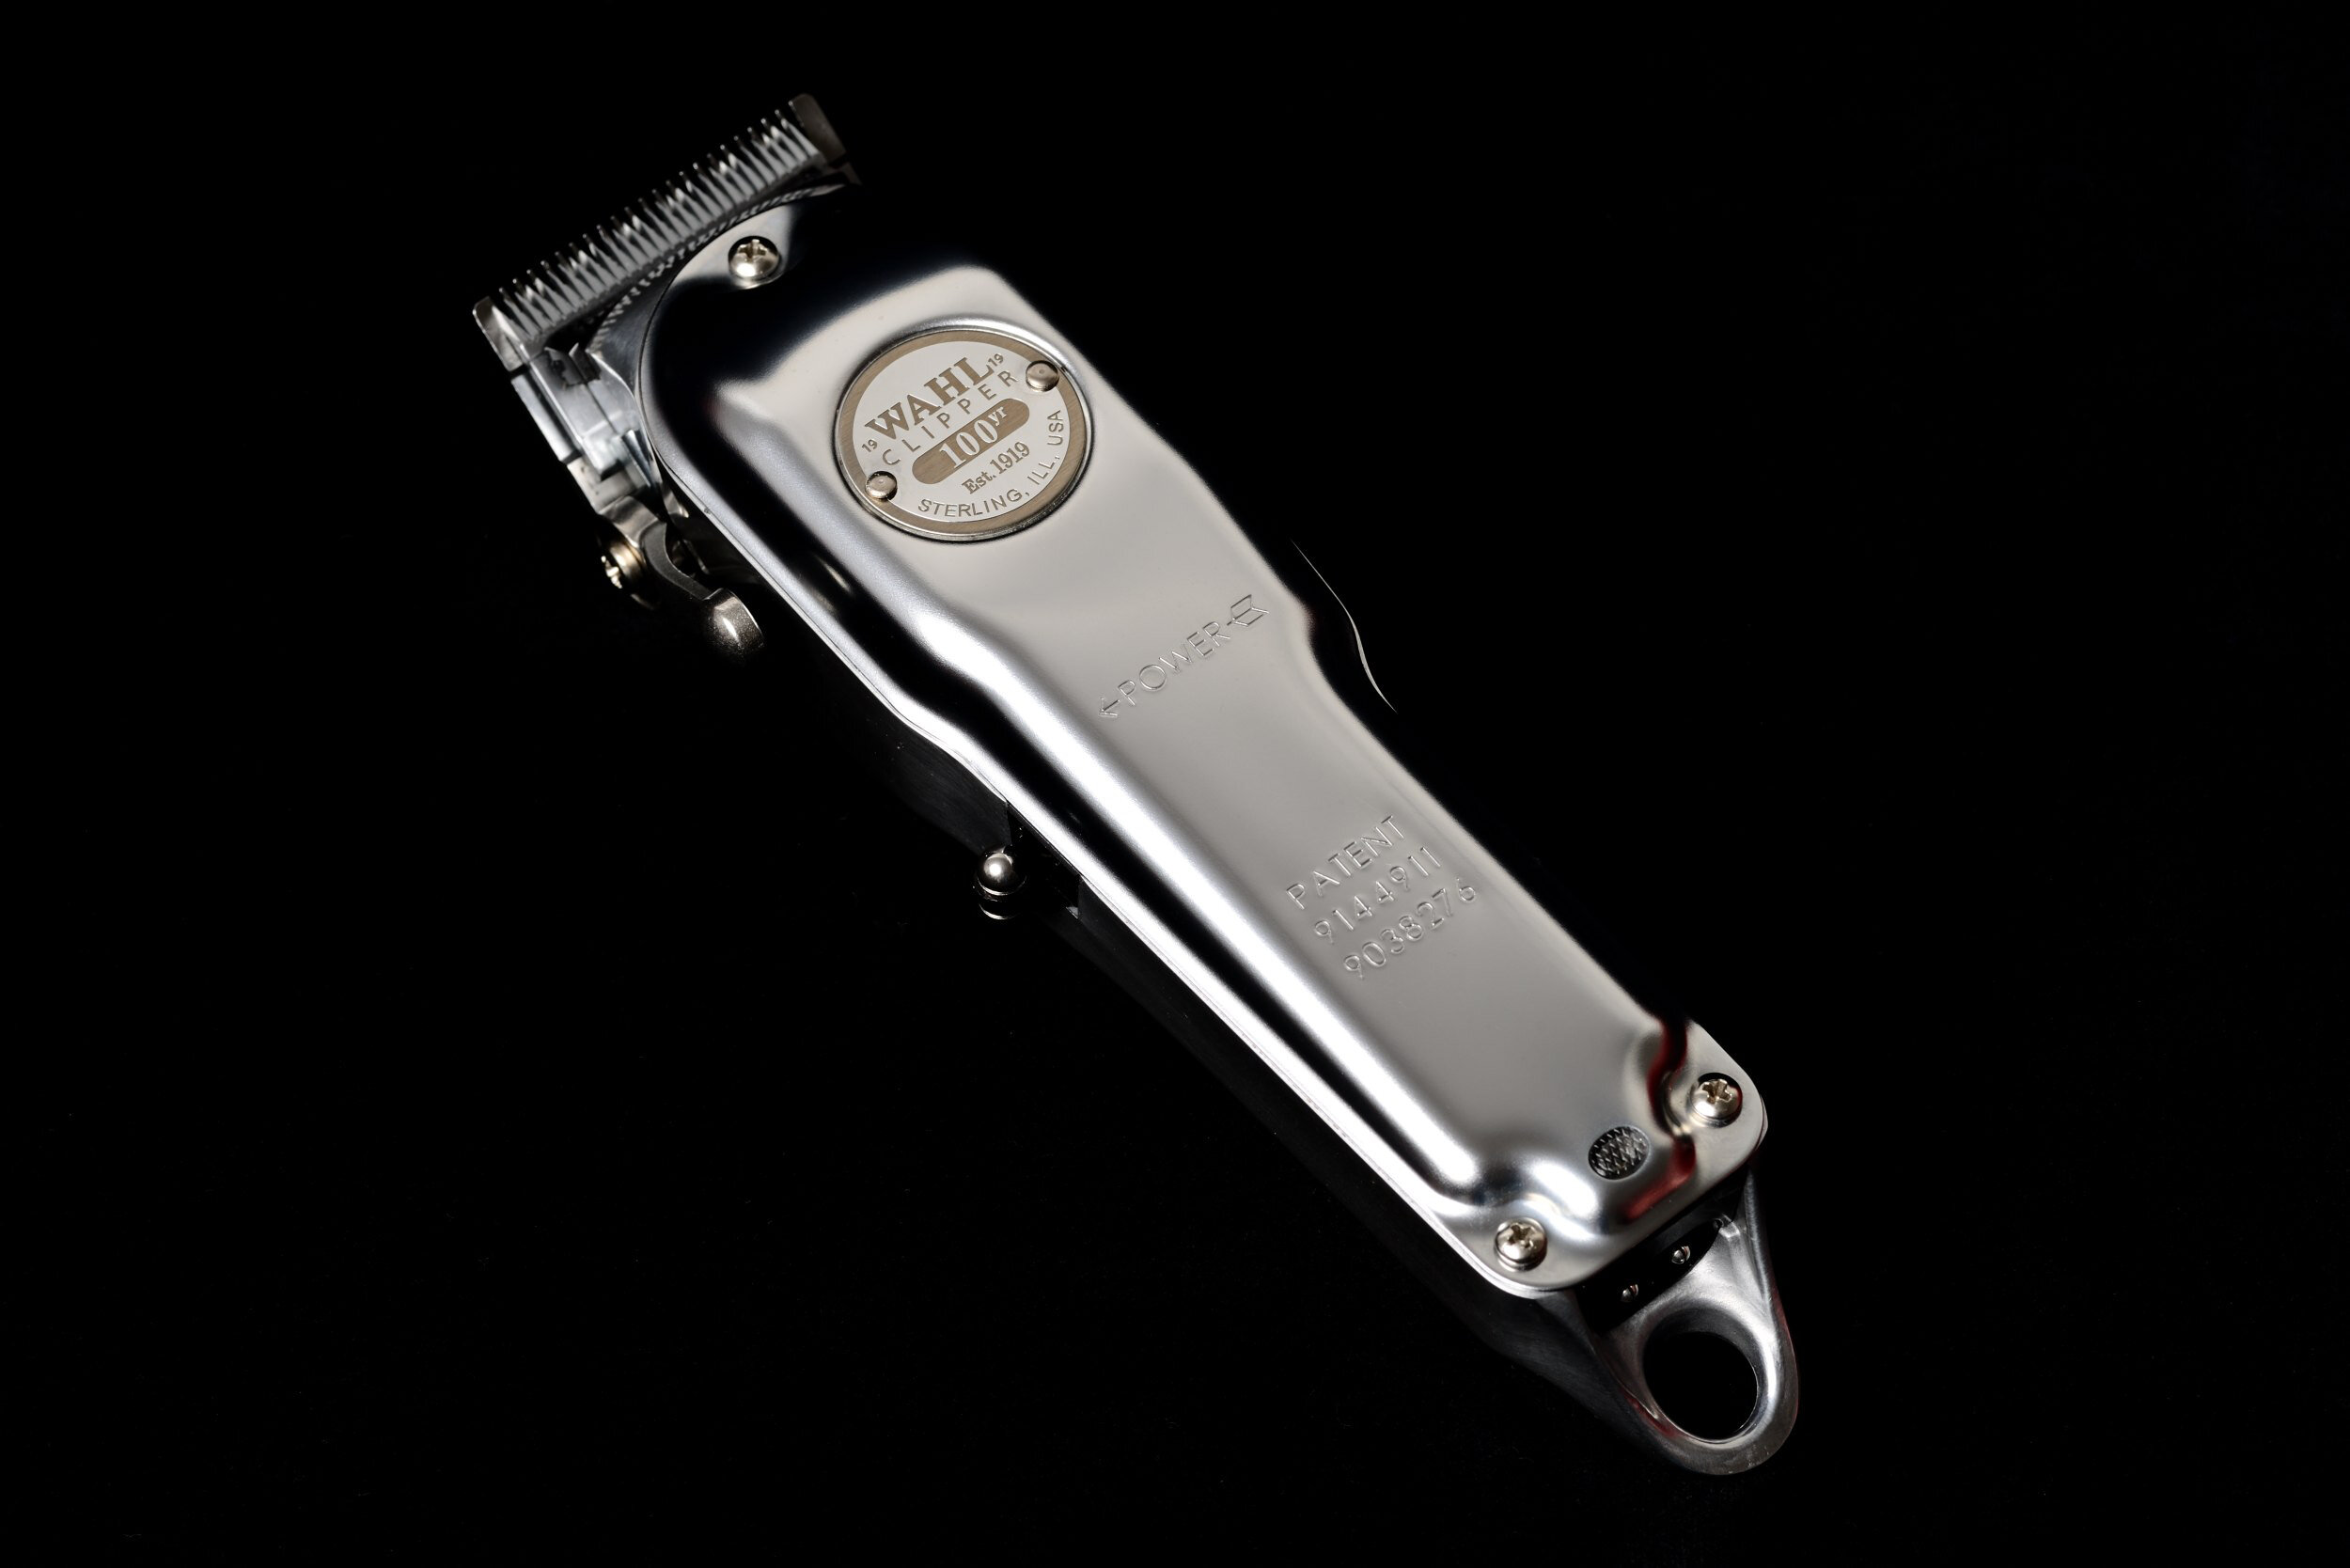
The Wahl 100 Year Anniversary Clipper - not on film, but beautiful nonetheless.
Moral of the story: Always check for compatibility - especially if you intend combining 30 year old film camera with a state-of-the-art wireless trigger.
Note: In the end, it turned out that it was a technical defect in the Nikon F4. So the Nissin Air 10s can be used with any camera.

Darkroom Musings II - Dust & Scratch
All too familiar
After one hour of shooting, my client gave me this wonderful look and I just pressed the shutter in the right moment. Her expression was perfect, and the Kodak TMAX100 negative turned out to display perfect tonality. Her expression was conserved forever.
Into the Darkroom
Of course I would deliver this image to her and after a test print in the darkroom I recognized some dust spots. To save spotting afterwards, I lifted the condenser of my Leitz Focomat Ic a little bit and pulled the negative out. I instantly realized my mistake: the metal frame of the film carrier scratched the negative.
On the one hand this was a moment of frustration, on the one hand it served as an important reminder to myself: Analog photography is real - it is a process that requires attentiveness and precision.
After one hour of shooting, my client gave me this wonderful look and I just pressed the shutter in the right moment. Her expression was perfect, and the Kodak TMAX100 negative turned out to display perfect tonality. Her expression was conserved forever.

A special model on Kodak T-MAX 100
The Darkroom Takes, the Darkroom Gives
Of course I would deliver this image to her and after a test print in the darkroom I recognized some dust spots. To save spotting afterwards, I lifted the condenser of my Leitz Focomat Ic a little bit and pulled the negative out. I instantly realized my mistake: the metal frame of the film carrier scratched the negative.
On the one hand this was a moment of frustration, on the one hand it served as an important reminder to myself: Analog photography is real - it is a process that requires attentiveness and precision.

The scratch
The Darkroom Takes, the Darkroom Gives
Of course I printed the image anyways: with the scratch. Was it ruined? Absolutely not: After some spotting my mistake was barely visible and I handed a happy client some wonderful portraits of her.
Analog photography and darkroom printing is a three dimensional process with room for mistakes. The prints and negatives are always organic - craft pieces for real humans in a real world.
What are you waiting for? Start printing!

The DSLR - As Analog As a Digital Camera Can Get
Analog Is Trending!
The digitization removed many tactile experiences from our daily lives. Letters are written less and less on paper, many purchases are made online without physically interacting with the goods and the smartphone has become essential for our daily survival. Let’s be honest, it is an age of screens and electronics.
Nonetheless, analog is trending and this is more than a hipster spleen. It is a conscious decision of many people to allow tactile experiences back into their lives without abandoning the advantages of the digital revolution.
Analog Developments in Photography
Analog experiences gained more and more popularity in photography as well. I could write many articles about this but I just want to list some very obvious trends of the past few years:
The analog photography revival in general
Old school control concepts on digital cameras (e.g. Nikon Df, Fuji digital cameras, Leica digital rangefinders)
New film stocks (e.g. Kodak E100, Ilford Ortho Plus, Kodak P3200) and darkroom papers
New analog cameras (e.g. large format, Leica rangefinder, Ilford Sprite)
Increase in community darkrooms

Can you spot the similarities? The analog Leica M4-P and the digital Fuji X100V
The DSLR Is a True Analog-Digital Hybrid
Now looking at the DSLR, its heritage can be traced back to the analog SLR. It combines traits from the analog and the digital. While tech enthusiast might say that this is a disadvantage as it hinders certain technical advancements when compared to mirrorless cameras, I’d say quite the contrary is true!
The DSLR offers the perfect user experience for photographers who appreciate analog processes but need digital files for their work.
Some thoughts:
The SLR Experience
Looking through the viewfinder of a DSLR is just like looking through the viewfinder of your favorite film SLR. It offers a unique immediate viewing experience. And the occasional dust spot on the reflex mirror reminds you that this is real and serves as a reminder that you are not looking on another digital screen. Oh and it is as lag-free as it will ever get.
Pressing the shutter results in an audible sound and a short blackout. This is a true analog reminder that you’ve just taken a photograph. I just love that.
Turn Off the Screens
To add to the analog experience, you just have to turn image review off and the DSLR behaves almost like any analog SLR (or very expensive Leica digital rangefinder) would.
Vintage Glass
Nikon DSLRs take almost every F-mount lens ever made up to this day. To further enhance the analog experience you can always attach your favorite manual focus lens.
An Almost Analog Control Concept
Although a camera like the Nikon Df excels in this field, it is noteworthy that even the latest Nikon D850 can be operated almost like an analog camera back in the days. You can even set the aperture via the aperture ring if you like.

The Nikon Df with the manual focus Voigtländer Ultron f2,0 40mm SLII-S AIS Nikon - a digital camera with analog feel
Get a DSLR!
So if you are like me and look for analog experiences in a digital screen world, then don’t hesitate. Get a DSLR over a mirrorless camera and integrate a genuine analog user experience into your digital workflow.
I shot only mirrorless for many years (before it was mainstream…) and I don’t miss it at all. One screen less in my life.
Book Recommendation
Check out the excellent book “The Revenge of Analog” by David Sax.

I sold my Nikon D700
I love the D700 and it was one of my go-to cameras for portraiture. There are many things to like about this famous camera and I dedicated an extensive review to it.

My D700 with the 50mm f/1.4 AF-D
Nonetheless, today I wrapped it up and sent it off to its new owner, and here is why:
As I do own newer Nikon DSLRs as well, I found that I was increasingly missing some features in the D700.
No quiet shutter mode
Although it seems like a minor issue, the quiet mode does make a difference especially when shooting certain parts of a wedding.
No Auto-Distortion Correction
When capturing JPEG the image files are not corrected automatically. This becomes especially apparent when shooting with the AF-S NIKKOR 24-120 mm 1:4G ED VR (which is one of my favorite lenses) - it has some visible distortion. There is a solution to the problem, I know: Processing the NEF-files in a RAW-converter. However, this adds an unnecessary step to my workflow before I can start retouching the image.

“Auto-Distortion Control” in the Nikon D800’s menu
Too Many Other Cameras
I also have the awesome Nikon Df and a like new Nikon D800. These two cameras do essentially the same things while offering some benefits (video recording in the D800, better sensors). Being newer cameras, they also feel a little bit more “agile” than the D700.
The D700 Is in High Demand
Another consideration that made the decision easier was that I was able to sell the D700 for 400 €, which is 100 € more than I initially paid for it.
There is currently quite a hype surrounding the D700 and it was just too tempting. So I have one camera less and I’m ok with it.

Slide Film!
Fortunate Findings!
Almost by accident I came into possession of a Leica Pradovit PC slide projector - it is Leica’s last slide projector and an amazing piece of equipment.
Slide Film in the 21st Century
After musing a little bit about slide film, it started to dawn on me: Slide film might be the best way to create analog color photographs in the 21st century.

The Professional’s Choice
Slide film outresolves C41 color film and offers incredible sharpness. This article by onlandscape is very insightful.
No wonder it was the professional’s choice when analog was used commercially on a large scale.
It’s long term stability is also much better than C41 film - making it an archival choice.
Finished Product
One thing I like about film photography is that each film stock has a “built in look” and unique properties. But when it comes to negative film, especially color film, the material offers many ways to interpret the positives.
This makes color converting C41 film inconvenient, especially when scanning. TSlide film avoids all these things - after development it is a finished product that is equally suitable for printing (after scanning), direct examination on the light table and of course for projection.
Not That Expensive
While print film is less expensive per roll, it is not necessarily cheaper. When you order small prints together with development, a roll of slide film and print film are equally expensive.
Slides Only?
Given these amazing advantages of slide film over color print film as well as the fact that my Leitz Pradovit is hungry for slides, I decided to go for it and bought a brick of Kodak E100 and some Fuji Provia 100F.
If I like the results, I might even stop shooting C41 altogether.

I'm not a camera collector, but...
Photographer vs. Camera Collector
I consider myself a photographer, not a camera collector. As a strong advocate of minimalism, I only keep a few cameras that I need for my work. I find owning too many cameras to be a distraction and detrimental to the creative process.
However...
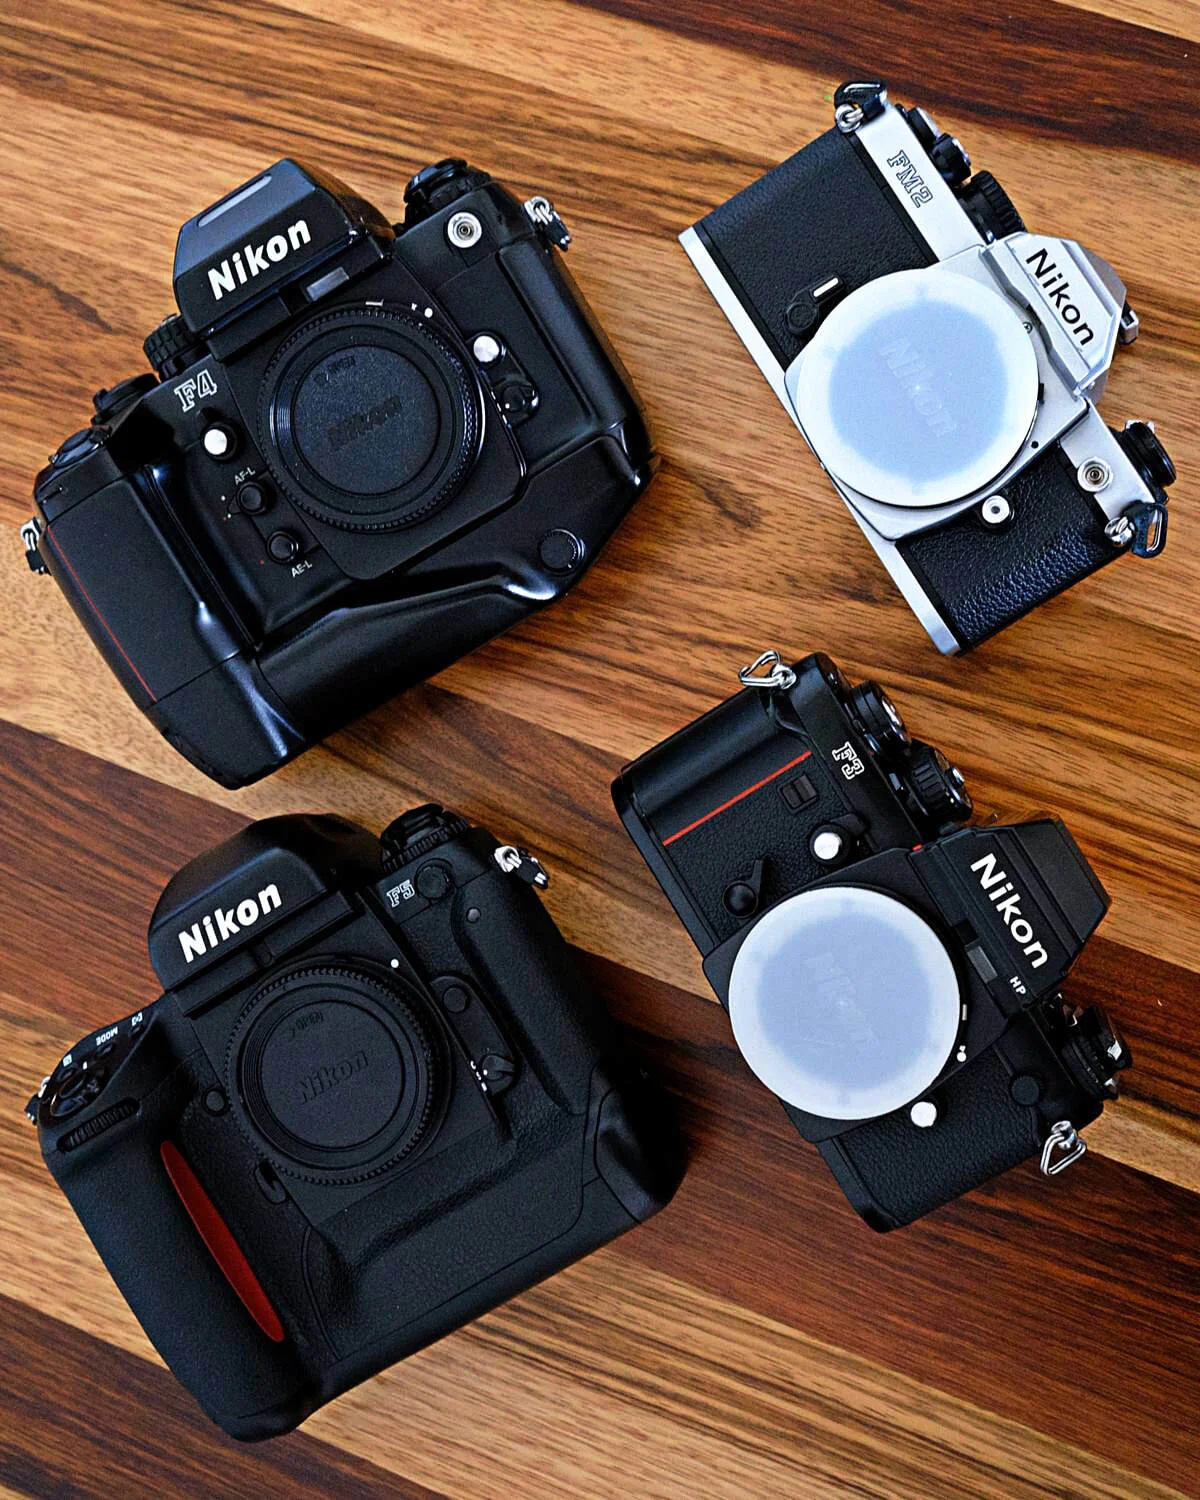
… as I mentioned last time, I decided to sell my Focomat IIc enlarger and a fellow photographer offered me:
a Nikon FM2T
a Nikon F3HP
a Nikon F4
a Nikon F5
a Rodagon 50mm f/2.8 APO
and a few other very nice things.
At first I was hesitant because it took me quite some time to sell off superfluous cameras in my possession but then I thought of this little blog of mine and said to myself: This is the time to get some interesting items to try out and review.
What can I say so far? The cameras are absolutely awesome - they needed some cleaning and the finder of the F4 required a small repair, but apart from that, I’m super exited to try them and review them properly in the course of the year.
Which one of these cameras would you like to shoot with the most?

Foto Wien 21 Postponed
While the loss of human life is definitely the worst side of the pandemic, the art (photography) also suffered a lot. Many artists struggle for survival because there are no art shows to present and sell their work.
While I got through the pandemic quite OK, it would be too positive to state that it did not impact my work financially and mentally. One of the most recent developments hit me quite hard.
Another COVID-19 Victim
In march 2021, I would have been honored to exhibit my work at the prestigious art festival FOTO WIEN in Vienna, Austria together with some excellent artists and acquaintances of mine. Yesterday I got the sad news that it was cancelled. Well, actually it is postponed until next year.
While I hope that I can still put my photography on display at the show in 2022, there is still the uncertainty whether the curators will change the overall theme and whether my work will still fit in there.
Am I bitter? Yes, a little bit. But it is better to have a good and safe event in 2022 than to have an exhibition with almost no visitors this year.
So let me end with positive thoughts: My picture would have been printed on the folder - Yay!

Foto Wien 2021 - it would have been a blast

From Focomat IIc to Focomat Ic
Downsizing - Film Format
In the past, I shot medium format for studio and selected high-quality work and 35mm for street and reportage photography. As soon as I got a Nikon F6 last year, I started shooting less and less medium format. So I decided to sell my extensive Pentax 67 kit and I did not miss it much - which surprised me quite a bit. Less bulk sometimes equals more fun.
Downsizing - Darkroom
It was only natural to follow suit by downsizing the darkroom as well. About 5 years ago, I purchased probably one of the best enlargers of all time - the legendary Leitz Focomat IIc. I spent a considerable amount to refurbish it - the lenses were serviced by Leica and wear parts were replaced by newly produced spares from Kienzle Germany. It is an incredible machine capable of auto-focus printing up to film formats of 6x9. However, for small format, it is a little bit of an overkill - and it is also very unwieldy weighing about 40kg.
After searching for quite some time, I found my new dream enlarger - a formidable Leitz Focomat Ic. It is the smaller brother of the IIc for 35mm film only. Like the IIc, it is also a condenser enlarger ensuring crisp and contrast-rich prints while being significantly smaller and lighter than its brother. I decided to get one with the tall column for convenient large magnification.
As these machines are quite old now, my Ic needs some refurbishments which I’ll share in subsequent blog articles.
Until then, happy printing!

Film Photography Needs People Buying New Cameras
Too Good to Be True
Imagine there is a new film camera on the market, that does it all:
High-end AF and tracking
Manual focusing with a split screen
Compatibility with one of the largest lens ecosystems on the market
Small form factor
Ultimate battery performance
Professional-grade build quality
Almost inaudible shutter
Compatible with the most advanced flash metering system in the world
10 years of parts availability and service by the manufacturer
Made by a prestigious camera brand and not some Kickstarter campaign
ALL the features a photographer could ever want in a camera EVER
And now imagine it only costs 2.200 Euro brand new with full warranty - at your local camera store.
A few weeks ago, this camera still existed - it was of course the one and only Nikon F6.

The Nikon F6 needs a successor
How Serious Are We About Film Photography?
Imagine a photographer buying a 2.800 mirrorless digital camera (lenses not included) that will only work on this digital camera. It is a camera that does the same thing that his or her previous 36mp digital already did - but this one is a little bit better. Imagine the photographer is taking a few shots with the camera and finds out it just produces the same digital files.
Do you think there will be a realization that the lump of electronics he or she just bought will probably work in 5 years, but he or she won’t be the person with the newest coolest camera anymore?
By not buying a new F6, the photographer missed a lot. He berobbed himself of opportunities regarding socializing with the shop owner when buying film and supporting a local business. Think about all the people the photographer might have met at the camera store.
So the photographer wants to shoot film despite his new digital camera. He goes an online auction site and tries to find a film camera. But he or she only has 200 Euro left for a camera with lens and some expired film.
This Is the Issue
Film shooters have the money, many do. But many are not serious enough about film photography.
It is a novelty, a thing they like doing. A thing they pretend caring about but not willing to fully invest in. If in doubt, they will buy a digital camera instead.
I’ve been like that before I’ve bought the F6 – and it was a mistake. The new F6 was the best thing that happened to me camera-wise. This is a tool to support professional applications and all hobbyist endeavors.
A Bleak Future if We Don’t Change Now
There won’t be any parts for our beloved film cameras. Many circuit boards will have died or will be in need of being reworking costing 500 Euro for a specialist to sit down and attempt the repair – there is no guarantee it will work. Only a few film photographers will make this investment.
The others will just abandon the medium for another film simulation preset pack they just bought for 100 EUR.
There is only one way around it: Stop giving great products a bad name just because you can’t afford it. Save for a newly produced film cameras (now only Leica is still in the game) – Buy yourself a companion, not a circuit board. Buy new film. Shoot film. Buy darkroom paper and print.
Send manufacturers e-mails that you would love to buy a new film camera from them. Don’t wait.
Invite People to Film Photography
Don’t compare it to digital in terms of image quality, but compare it in terms of electronic waste, waste of resources and lack of emotional connection with one’s equipment.
And if there is a new camera on the market, don’t expect it to cost 500 Euro while being the do-it-all camera that will last a lifetime and gets brassy around the edges.
Don’t treat film photography as a novelty, treat it as PHOTOGRAPHY.